How to Connect Your Chatbot to Dialogflow
In this post, we're going to learn how to connect your Stackchat chatbot with Dialogflow, which is Google's NLP API.
What is Natural Language Processing (NLP)?
NLP is an AI-driven process of extracting meaning from statements. In the context of a Stackchat bot, NLP is one of three ways for users to navigate throughout the chat experience, alongside quick navigation menus and keywords. For most languages, Dialogflow is the NLP provider you will be using alongside your Stackchat bots.
Key NLP Concepts
Below are some important terms to understand relating to NLP. In this article, I will show you how to set them all up in Dialogflow.
Intents: The NLP's understanding of what the user is trying to say in an utterance. For example, if your NLP is configured to recognize utterances related to searching for liquor to purchase which we'll call liquorPurchase, it could recognize that when a user says "Show me Japanese whiskies under $100", it should label that with the liquorSearch intent.
Entity: Individual pieces of data extracted from an utterance which has been matched to an intent. In the example above, we would probably have three named entities that were recognized, liquorPlace (Japanese), liquorType (whisky) and price (under $100).
Learning Phrases: NLP needs to be seeded with a number of learning phrases to successfully determine the intent and entities of each utterance. In the example so far, we'd have as many phrases as possible around searching for liquor for the NLP to learn from.
Agent: All of the intents, entities and learning phrases taken as a whole constitute one NLP agent. As your bot grows in complexity, your agent will grow in size.
NLP Pros & Cons
To decide whether or not to use NLP in your bot, it's important to balance several key factors.
Pros
For bots with complex and/or numerous functions, NLP is a must. Keywords cannot capture entities like NLP can and require followup for complex interactions, while quick navigation is not ideal for bots with many functions.
NLP provides responsive, fun and human-like interaction. A robust agent can respond to many different utterances with accuracy, allowing users to interact with your bot easily in a way that bots without it cannot.
NLP gives your bot more flexibility. As Dialogflow generalizes its intents, you'll be able to pick up a variety of user utterances that keywords can't match and expands over time.
Cons
NLP adds additional complexity and labor. Setting up your agent can be a time-consuming process that for most involves learning new skills (that this how to will help you gain!). Maintaining your agent adds even more throughout the lifetime of your bot.
NLP adds cost. Dialogflow is a paid service, and the more users your bot has, the more its costs will scale.
In thinking about whether your bot should include NLP, thinking about how you want users to interact with your bot is paramount, while also thinking about the level of effort you want to expend in getting your bot up and running. For some bots, NLP will address a clear need and make the choice easy. For others, it may be better to consider what you can accomplish with keywords and/or quick navigation.
Creating an NLP Agent in Dialogflow
So you've decided your bot would benefit from the fun and flexibility of NLP? Getting started with Dialogflow is quite easy. The Dialogflow documentation is quite thorough, but a good part of it is not necessary for use with Stackchat, as many of the features it has are not used. Stackchat bots use an agent's intents, entities and learning phrases only, with sentiment analysis available for analytics as well. So stick with me as we walk you through setting up your first agent.
Naturally, you're going to need a Dialogflow account to get started. Dialogflow is a Google service, so you'll want to bind your new or existing Google account to get started.
Custom Agents
Once we enter Dialogflow, we'll start with what is basically a blank slate with a couple of Create Agent buttons.
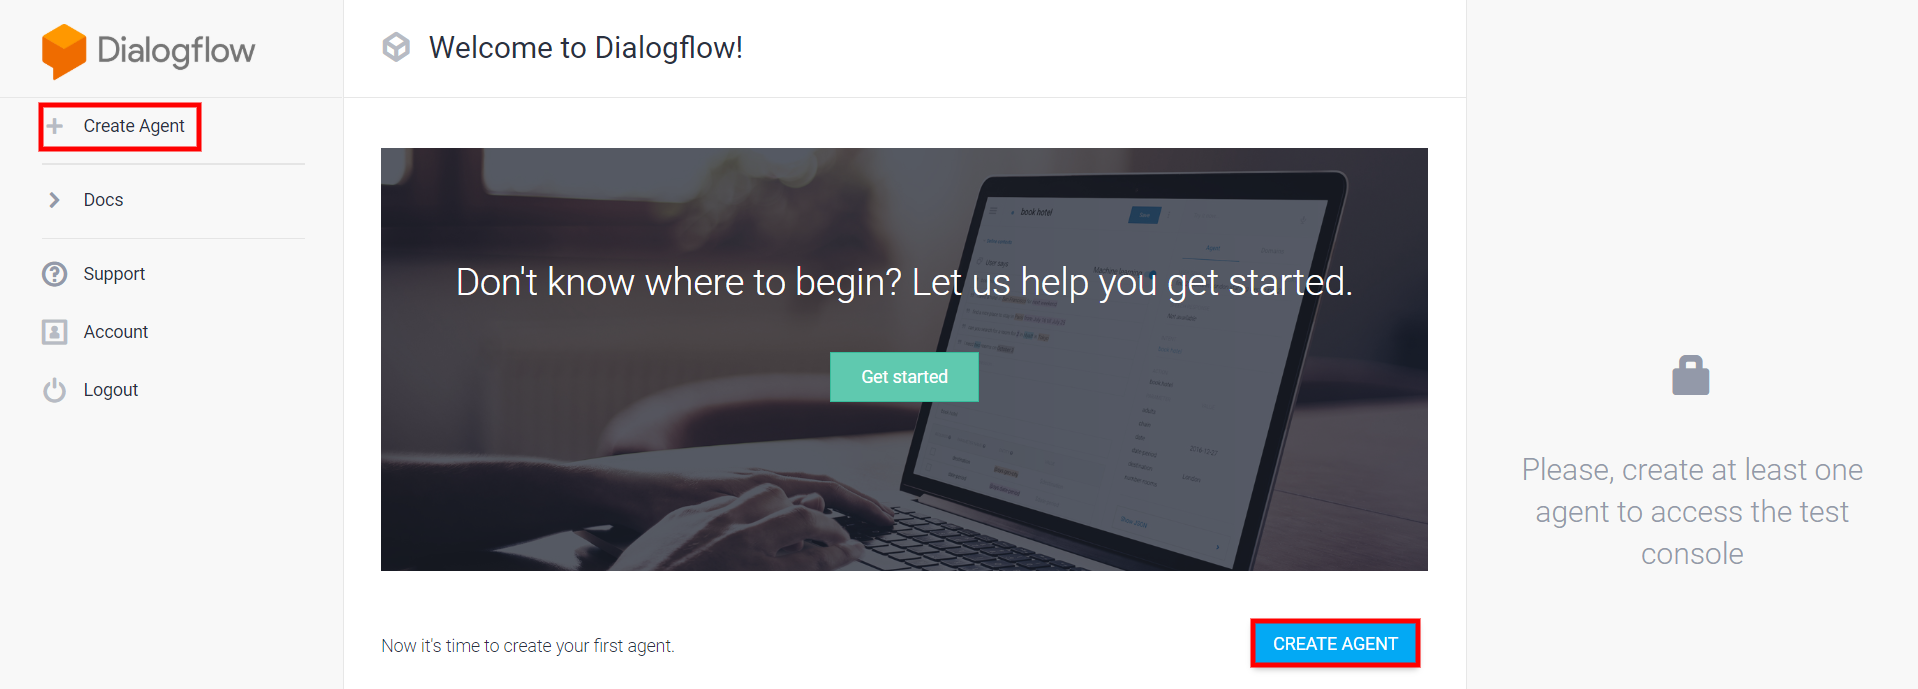 The welcome page for Dialogflow
Go ahead and click one of the two buttons marked above and we are greeted with the agent creation screen seen below.
 The create agent screen
Now it's time to give our agent a name. Building on my example from earlier, our agent is going to help the user shop for alcohol in its many forms, so I'm going to call it drinkShopping.
We'll stick with English as the language and the time zone it suggests. We will leave it set to "Create a new Google project" as well, which will be the case for any agent you create for Stackchat. This agent does not need to be a Mega Agent, which is an agent with up to 10 sub-agents.
 An agent ready for creation
Just hit Create Agent and we have our first agent. Congrats!
We'll be sent off to the Intents page of our shiny new bot. There are two intents that are automatically generated, the Default Fallback Intent, which is the intent that the agent responds with when no intent matches. The other is the Default Welcome Intent. It contains learning phrases for greetings (hey, hi, yo son!, etc.) and uses Dialogflow Events, which are not supported by Stackchat, so let's just go ahead and delete it. Don't worry, we'll be adding back small talk in the next section.
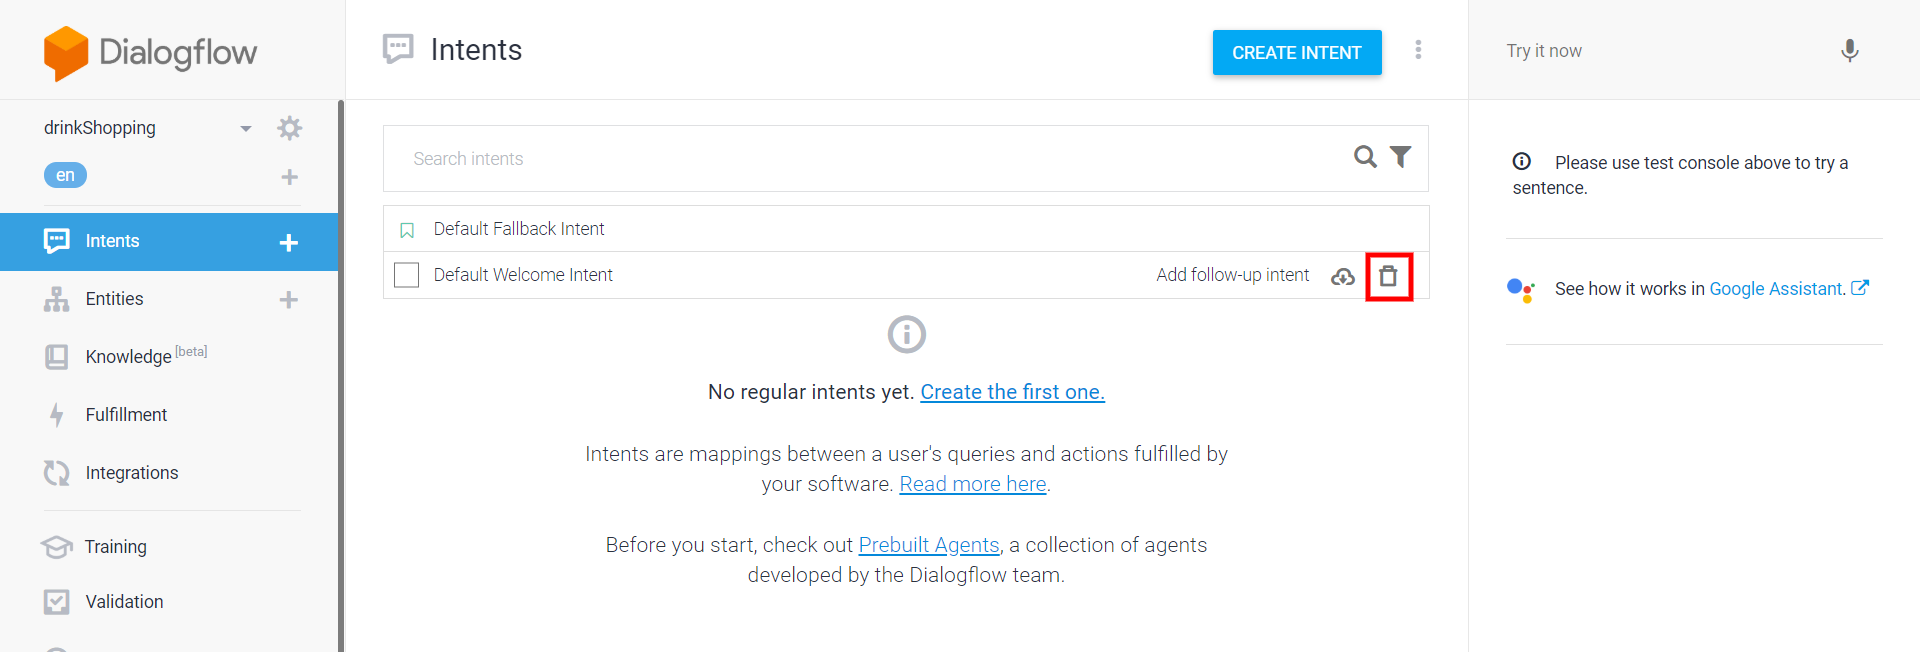 Click the trashcan to delete an intent
Prebuilt Agents
Prebuilt agents are NLP agents created by the Dialogflow team. They contain a number of intents, entities and learning phrases that you can use as a launching pad to get yourself started. The agents available differ depending on the language you choose. English happens to have a lot of them! So always remember to take a look to see what they have when starting a new project. Their quality varies a bit, so it's not safe to assume they'll do all the work for you.
Click one of the two buttons and take a look.
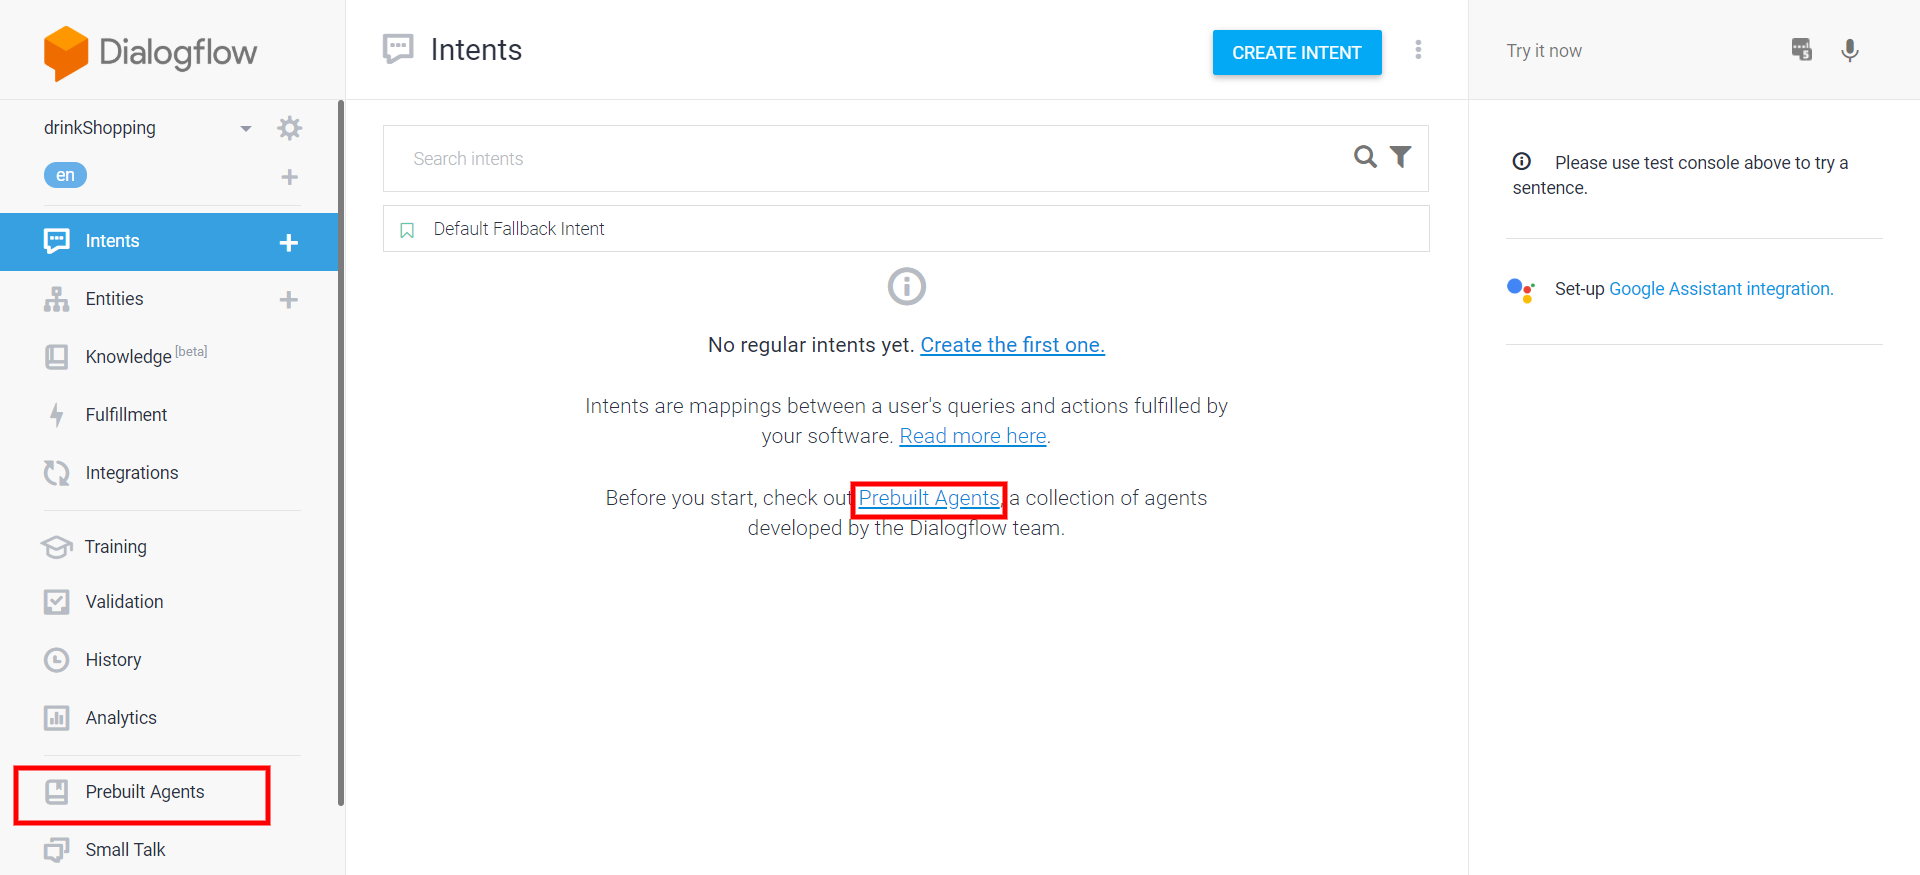 Off we go to install a prebuilt agent
We want the greeting functionality that disappeared when we blasted the Default Welcome Intent and add some other common expressions to my agent, so we're going to add the Small Talk prebuilt agent. Scroll down to Small Talk and click import.
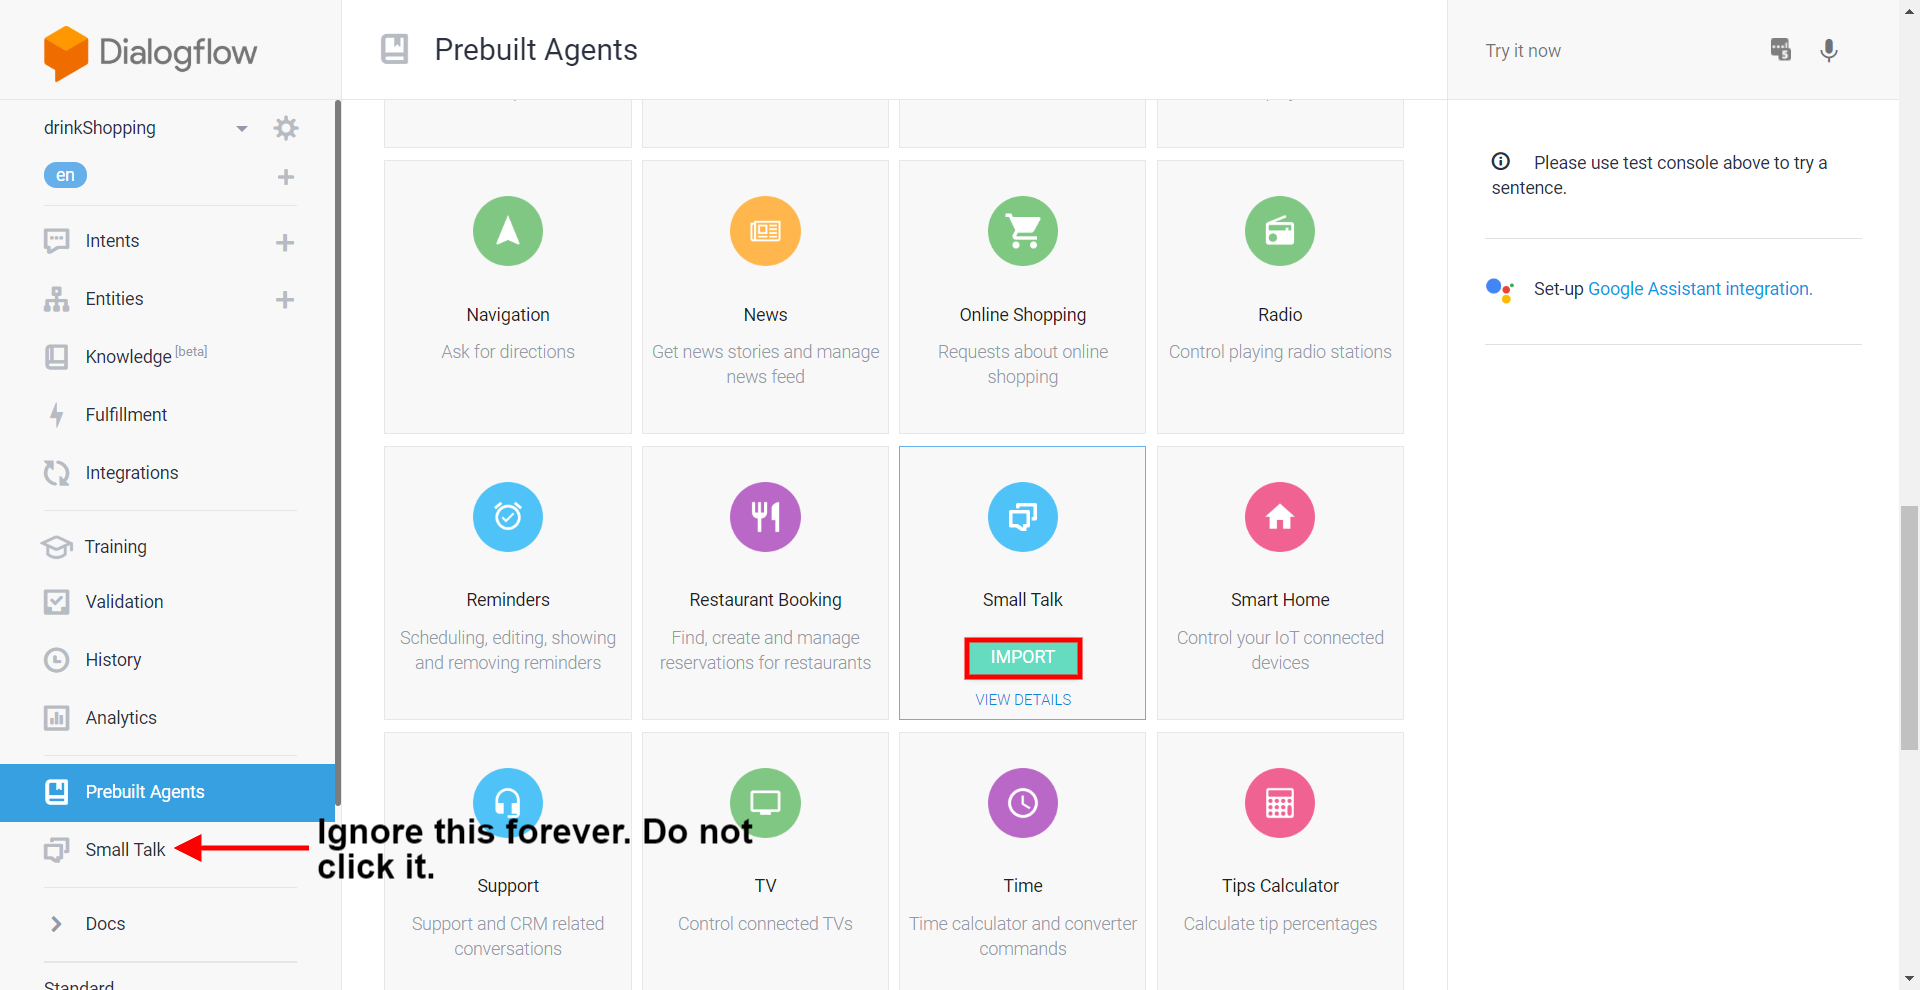 They're alphabetical, so I'm sure you can find it
As indicated by the red arrow and text, this is not the Small Talk functionality in the left menu. That serves much the same function, but it relies on Dialogflow responses, which are not used by Stackchat. All our responses will be added inside Stackchat.
Hit Import and Dialogflow will spend some time getting you set up. When prompted select "Create new Google Project".
Sadly, you will see that we are now in a new agent named Small-Talk. We were caught in a vicious bind where you can't create a prebuilt agent until you've first built a custom agent. But this is thoroughly okay. We can work with this.
 An agent devoted solely to small talk
We have a few different ways of handling this:
Rename the agent to something more descriptive of the functionality we want to build and put our custom intents together with the small talk. We could then delete the drinkShopping agent.
Export the intents from the Small-Talk agent and import them into the drinkShopping agent
Keep both of our agents and build the aforementioned Mega Agent
In this guide, we'll go for method two. It's not quite as attractive as the third method, but Mega Agents are still in beta and come with some rather tricky setup.
Before we do that, let's do one quick piece of housekeeping. Click on the gear icon next to the bot name to enter its settings. Then click on "Languages" from the menu at the top.
 Here be dialects
As you can see there are four dialects of English that are included. We do not want these, as they will mess up our agent when accessed through the Dialogflow API. (The learning phrases for each of the dialects and English are identical, so we are losing nothing of value.) Throw all four in the bin so that only the topline English is remaining and hit save.
Let's take a quick look at what intents we have now in the agent. Wow! Turns out we have over 80 different sets of learning phrases. We don't have any entities on them, which makes sense in this case. When you look at the learning phrases, there won't be any entities we'd want to capture, as these are just common expressions. The intent recognition is all we need here.
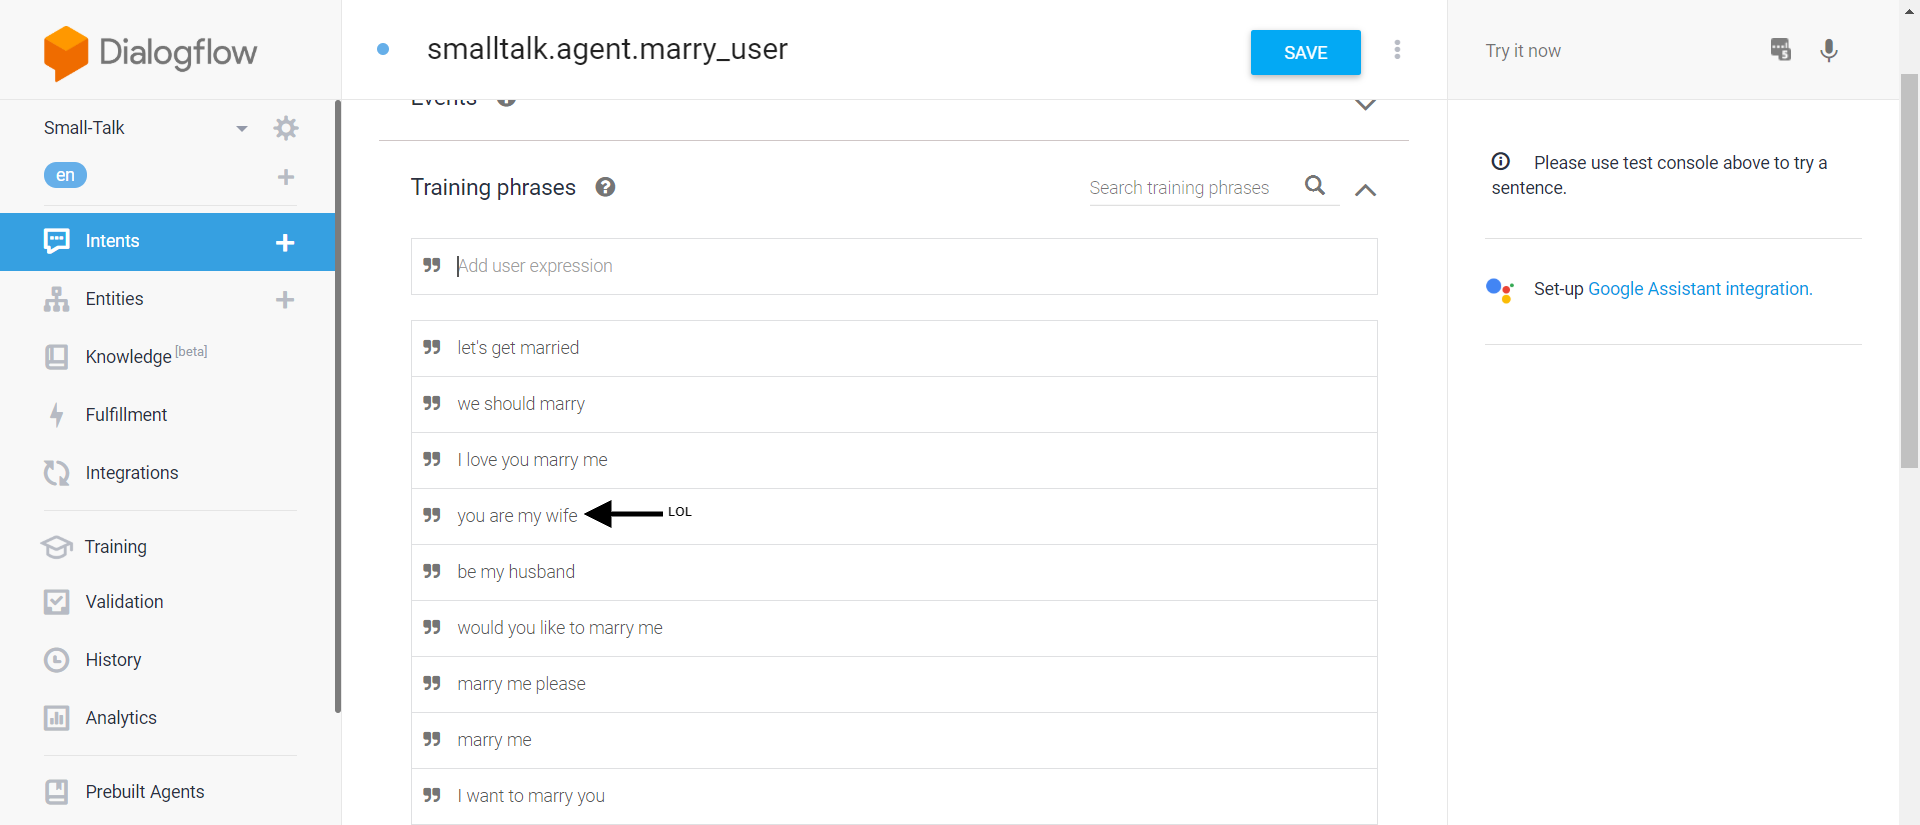 This intent recognizes when the user wants to marry the bot
In the example above, this intent recognizes when the user's utterance indicates that they want to marry the bot. A common scenario if you make very attractive bots.
As noted, there are over 80 intents here. That is a lot and more than you probably want to use. Feel free to prune any and all that you don't want to use.
Alternatively, you can map them to your fallback flow in Stackchat. (I'll show you this later.) This is tedious if you need to do it for many intents. However, it does preserve those intents in case you want to make your bot respond to them later. However, this can also be accomplished through imports.
Exporting/Importing Agents
Let's try importing our Small-Talk agent into our drinkShopping agent.
First let's go to the Small-Talk agent and visit its settings by clicking the gear icon. Then go to Export and Import on the top menu. Click the Export as ZIP button.
 Click the button to download the ZIP file
This will trigger the download of Small-Talk.zip.
Now let's go to the agent we want to add the intents to, drinkShopping. Enter its settings and return to the Export and Import page. Click the Import from ZIP button. (Do not select Restore from ZIP unless you want to overwrite the agent.)
On the modal, drag and drop the ZIP file you just downloaded, type "IMPORT" where it requests it and hit the IMPORT button.
All the intents from Small-Talk are now in drinkShoppinig! You can import the file below which has my completed NLP agent from this how to guide.
Creating Intents
Now we're ready to build out our drinkShopping agent. For this simple example we will just have one intent. Click "Intents" in the menu on the left and then click the Create Intent button.
 Create Intent button does its job
Give your intent a name and hit the Save button.
You've done it! Your first intent has been created. That was much easier than what came before. As of right now, it has no learning phrases and cannot recognize any utterances. Let's fix that.
Creating Entities
Before we start populating our learning phrases, let's define the entities that they will contain. Let's take the phrase I used earlier with a slight modification "Show me Japanese whiskies under $100 in Dayton". Let's see why I added "in Dayton" to the phrase.
System Entities
System entities are entities that the Dialogflow system already understands. These include things like cities (e.g. Dayton), dates, numbers, people's names and many more. Here is the full list.
You don't need to do anything special to access system entities. They're always available for you. Once we start putting in our learning phrases, we'll see them in action.
Custom Entities
For many entities, you'll need to roll your own. In my example, we're going to make three custom entities, a descriptor (Japanese), a liquor type (whisky) and one for modifiers to the price (under).
Let's use liquor type as our example. To add an entity, click the Entities button on the left. Click the Create Entity button.
Name your intent and start entering items in that class and any synonyms for them. Hit the Save button when you're done.
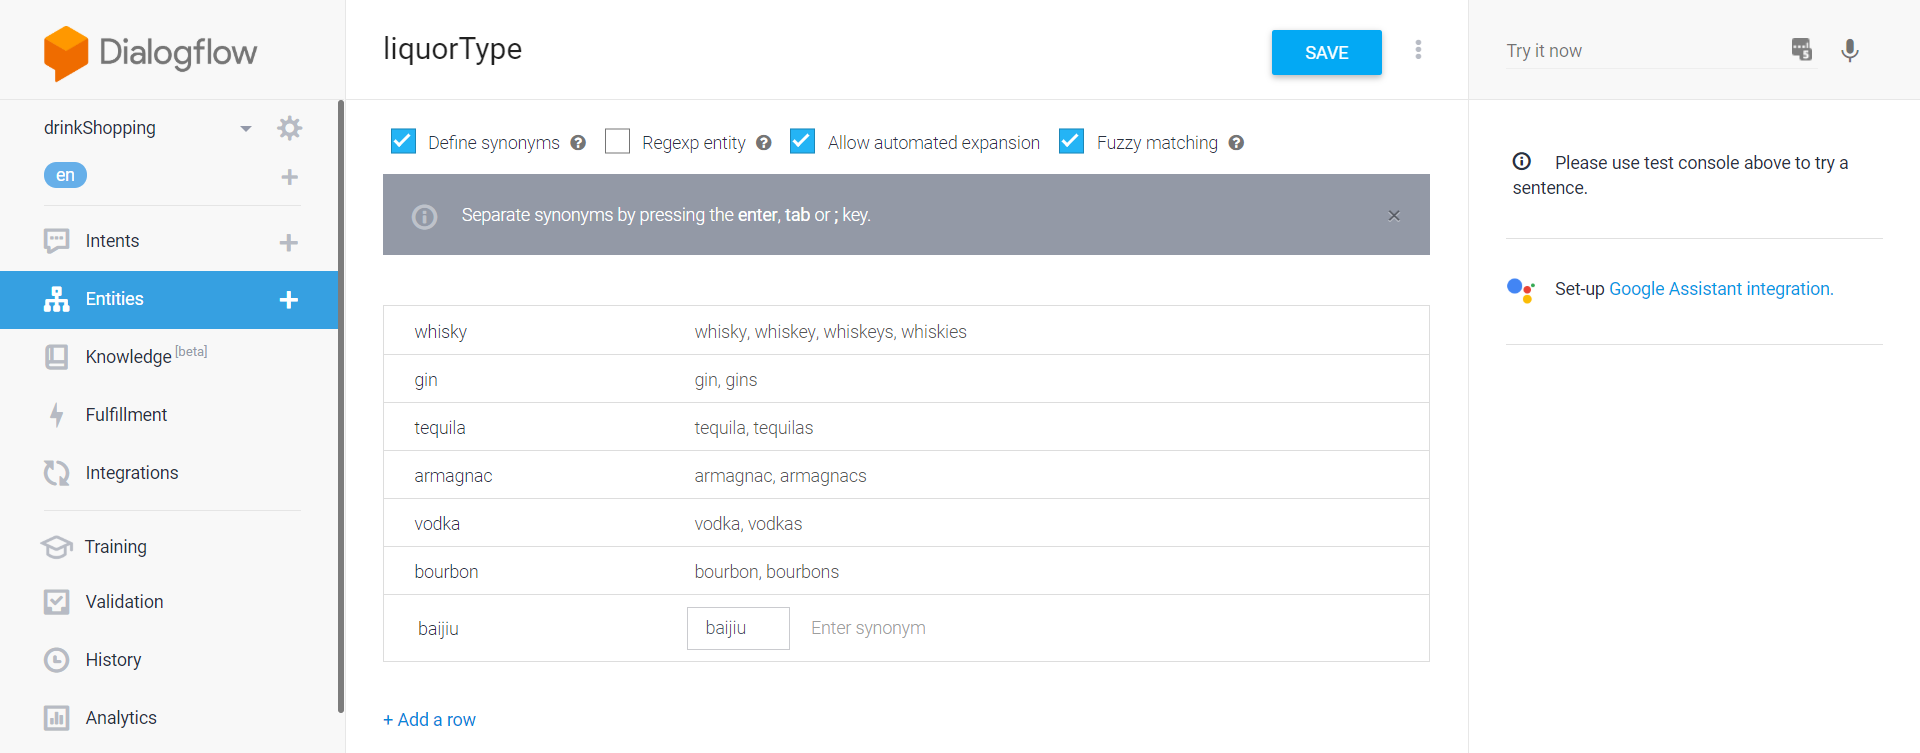 My sadly incomplete list of liquors
Take note of a few things here. We have turned on Automatic Expansion. What that does is allow things not in the list to be recognized. This can be useful for a couple reasons:
Some sets are extremely large and difficult to know all their members (not the case here, liquors are a fairly long list, but knowable).
Sometimes you might still want to see what the user is asking for to run through your API after the utterance is made. If Automatic Expansion is enabled, you will know that the entity was triggered and it's not part of your list.
Dialogflow advises that you should try to limit use of Automatic Expansion to one entity per intent. I have been known to bend that guideline and will again.
Fuzzy matching is on as well. This allows the agent to capture things that are close but not quite right, like typos and misspellings. It probably obviates the need for all the plural forms that we included, but better safe than sorry.
We can now create the other two entities we want to include. Here's the descriptor.
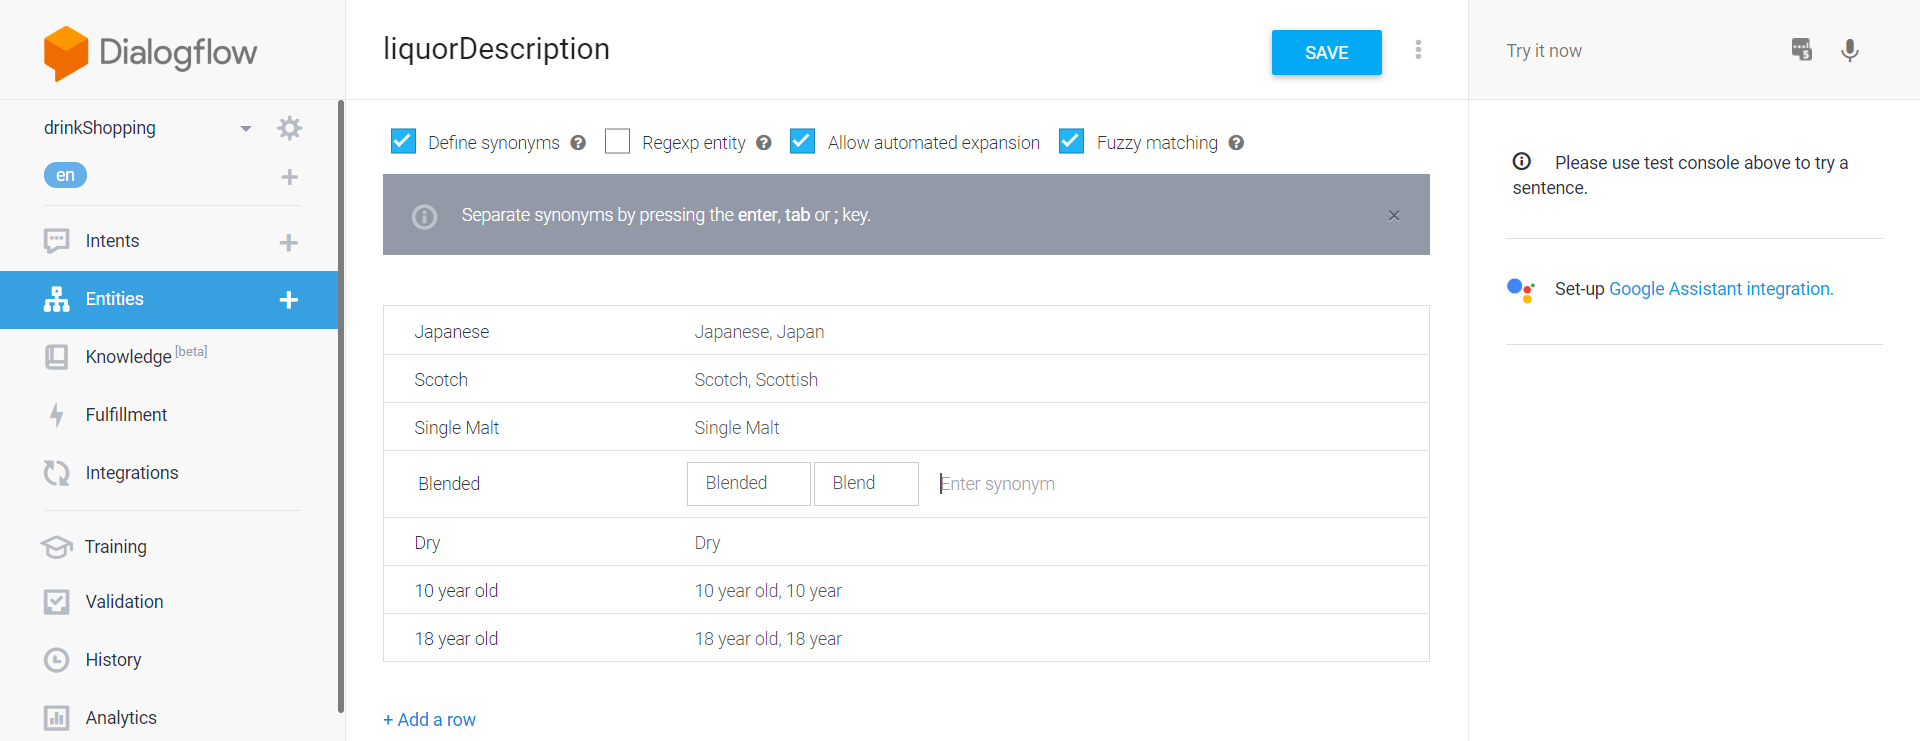 This list is even more incomplete
This one is missing just so many things, so we'll see how well automated expansion handles it.
And here are the price modifiers.
 I feel like this list is complete
We've turned automated expansion off for this one to avoid increasing the risk of the agent getting confused.
Our custom entities are ready to go!
Training your Agent
Right now, our drinkShopper intent still can't recognize any utterances because it has nothing to learn from. Let's fix that. Head back to the Intents page and click the drinkQuery intent.
Then click "Add Training Phrases". Here, we added the sample phrase from above. Now it's time to label it with entities!
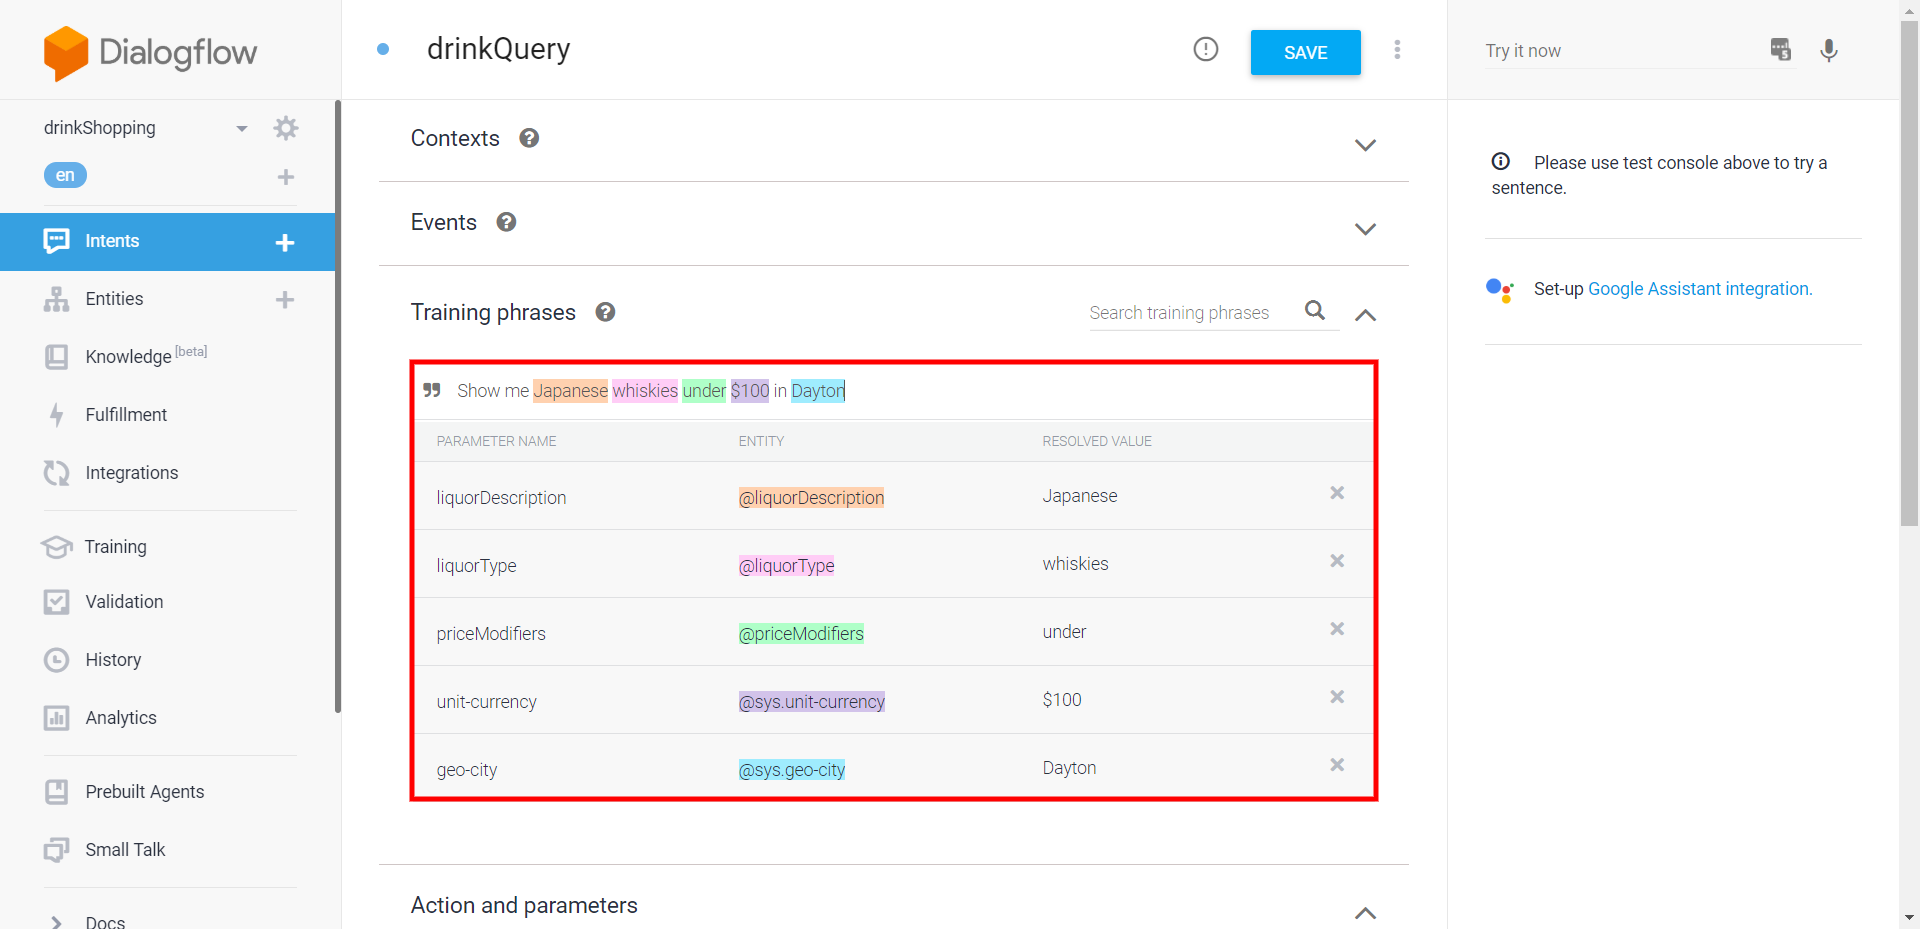 A fully annotated learning phrase
As you can see, we've labeled it with all five entities we use. As you add more learning phrases, Dialogflow will get smarter and start labeling things for you.
Let's add some more phrases.
 A modest group of learning phrases
We now have eight learning phrases of varying formulations of how someone might seek drinks, they range from complex to very simple. If someone just says "gin", who am I to judge?
Hit save and our intent should become functional!
Testing your Agent
Now that we have our fully functioning intent, we should go ahead and confirm that it's working.
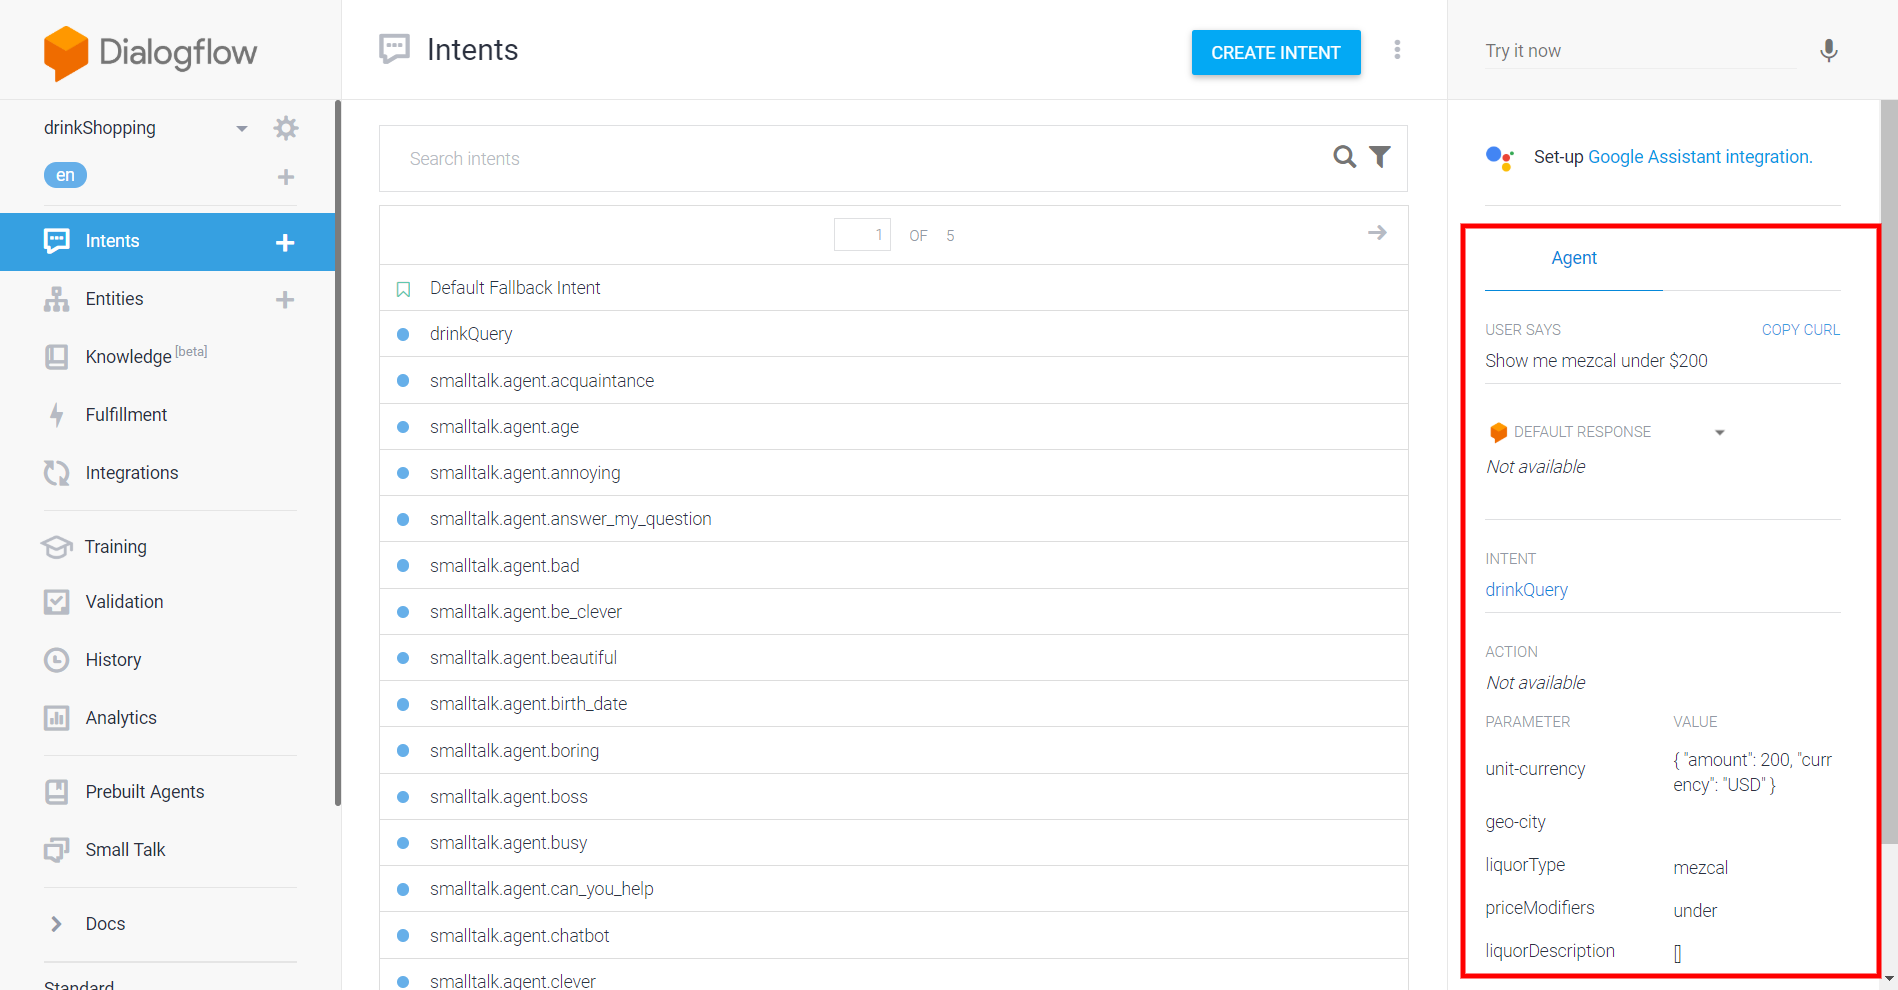
Your initial testing can be done directly in Dialogflow. Here is the utterance "Show me mezcal under $200". You may recall that mezcal is not in my entity. Let's hope automated expansion comes through.
 Testing in action
Great job, NLP! As you can see, it correctly identified the intent and the three entities in the utterance. If I just entered "mezcal", it's not going to succeed though. Automated expansion has its limits.
Before you push your NLP to users, you will want to take a more formal approach. This is where the F1 score comes in. You can check that link for now, and be on the lookout for our how to on the topic.
Maintaining your Agent
The work of building a better agent never stops! As users, whether internal testers or actual users, interact with your bot, all their utterances will be logged in Dialogflow and flagged if not recognized.
You can see this on the Training page of Dialogflow. Here are the utterances that we made through the Dialogflow testing console. Messages delivered through Stackchat using the Dialogflow API will look identical.
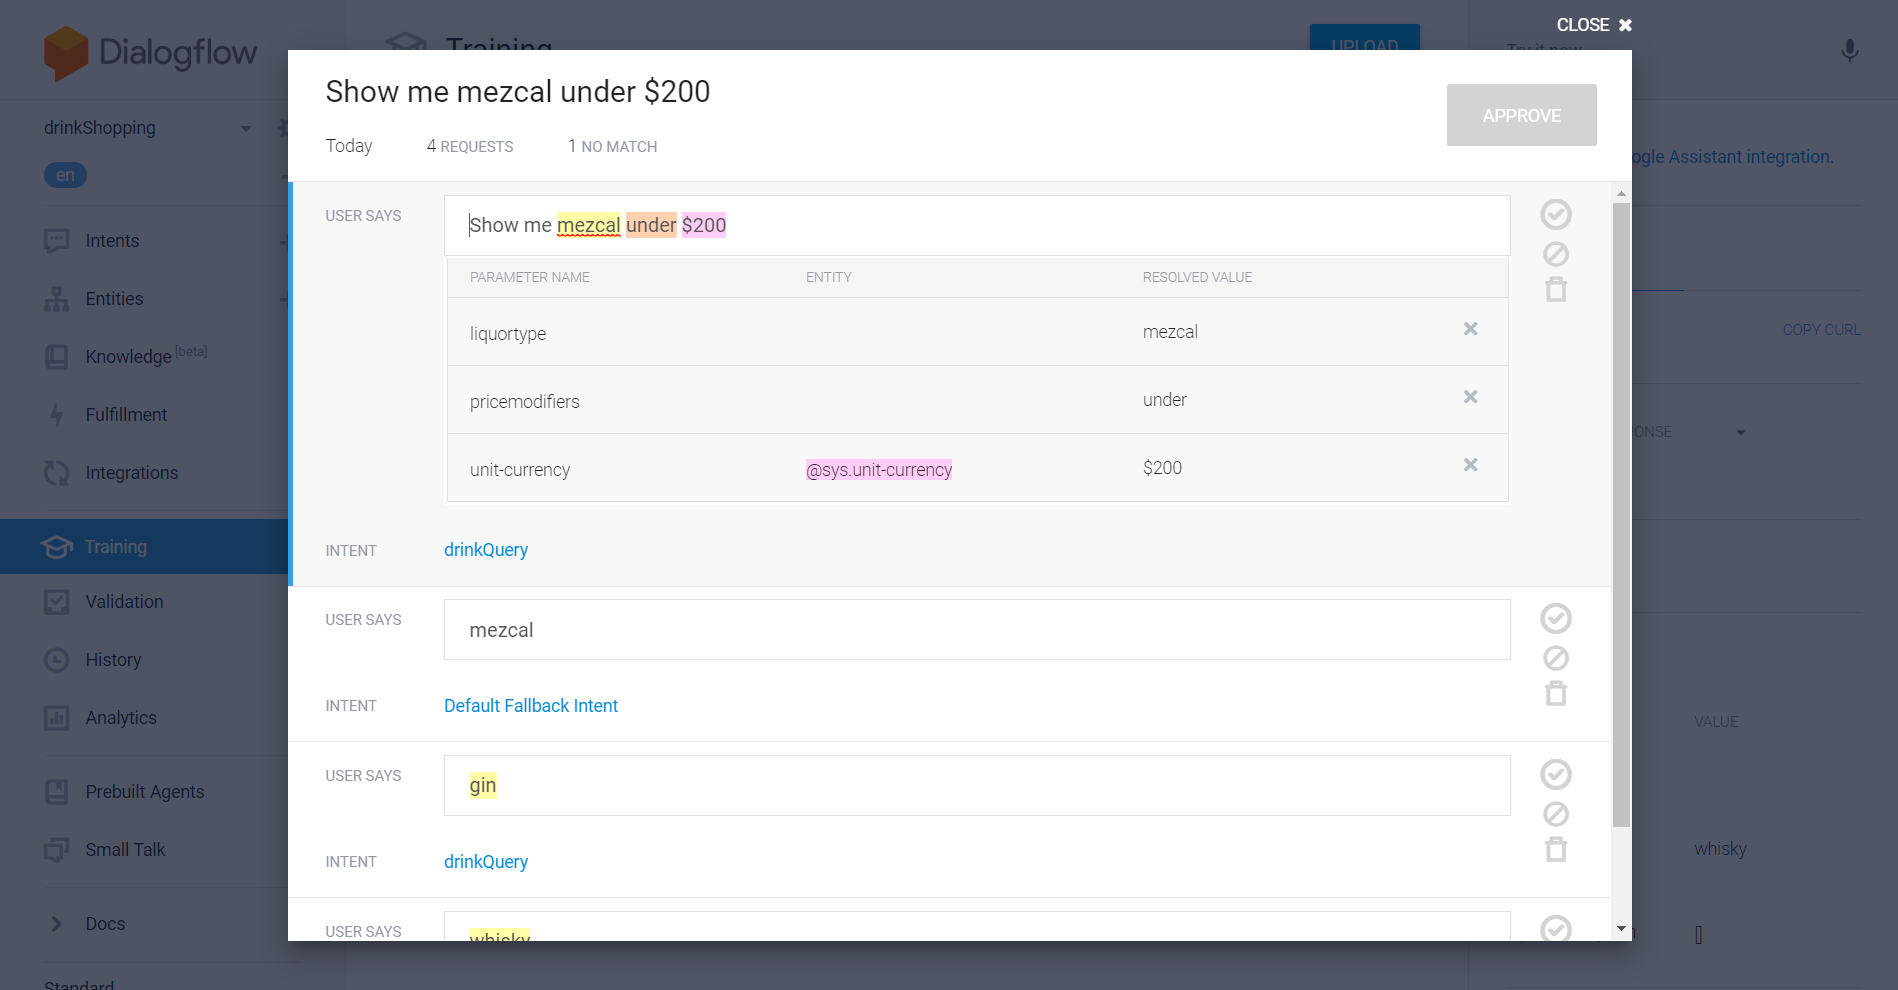 Some utterances in Training
Here, you can change the intent if it didn't match with the correct one and label any entities that were missed, just like you would when adding learning phrases. Make your changes, hit approve, and it will become part of the model.
Connecting your Agent to a Bot
Now that we know how to construct an agent, we need to connect it to your bot in Stackchat. To accomplish this, we will need a Service Account Key from Dialogflow.
Getting your Service Account Key
We have full instructions on acquiring your Service Account Key. Each agent you create will have its own unique key. Keep the key in a secure location, as you may want it to use it again in the future. You can however create new keys at whim.
Using your Key
Now that we have the key, it's time to add it to our bot. We've created a bot that serves my purposes nicely and published it. Let's head over to its integrations page and click the Add Integration button.
Select the Dialogflow Cloud Configuration. Now, just copy the entire contents of your Service Account Key JSON, including curly braces, into the key's field.
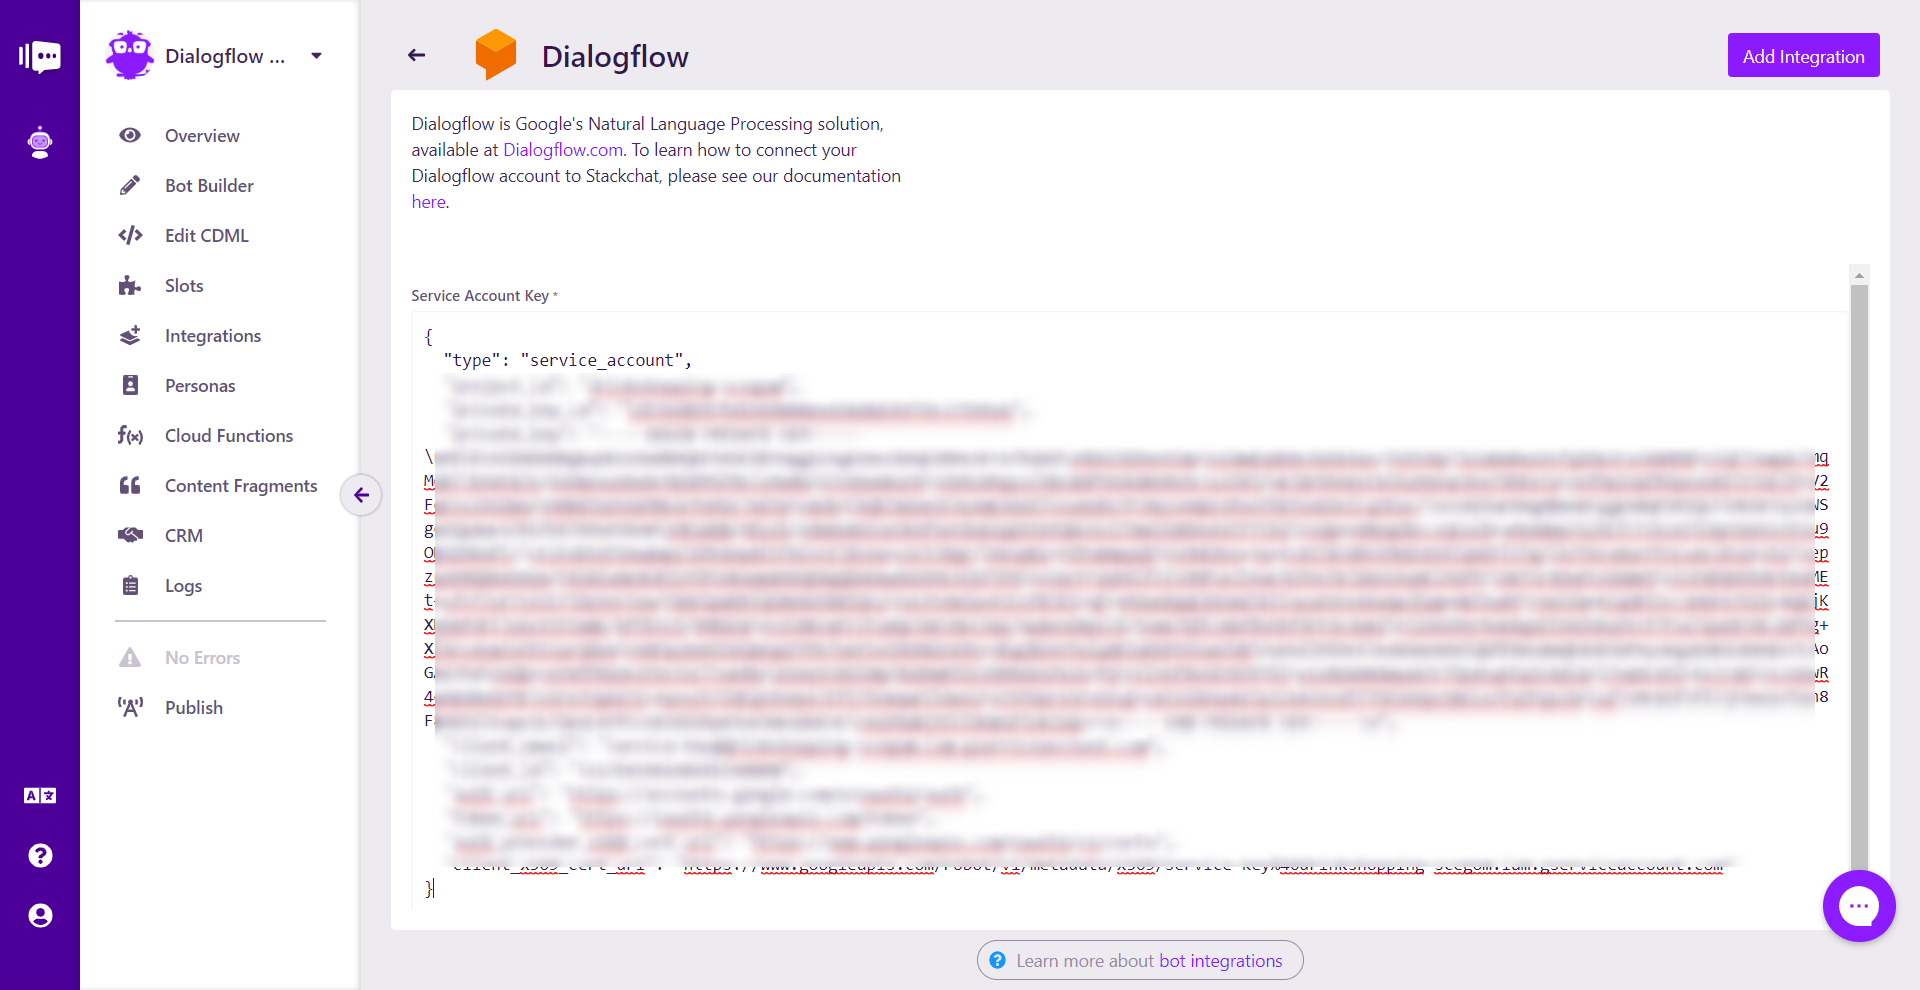 Blurred for the safety of my agent
Click the Add Integration button, and that's it! We've connected our agent to our bot, and it will activate on next publish.
Mapping your Agent to your Bot
Now that the integration has been created, it's time to map intents and agencies to flows and slots.
Mapping Intents
Intents can only be mapped at the flow level, not the element level. For this example, we'll just map two of our intents, drinkShopper and smalltalk.agent.marry_user. Let's start with drinkShopper.
We have a flow called drinkShopper Target. Right clicking on that flow will show me the flow menu slidein. Hit the Configure AI button.
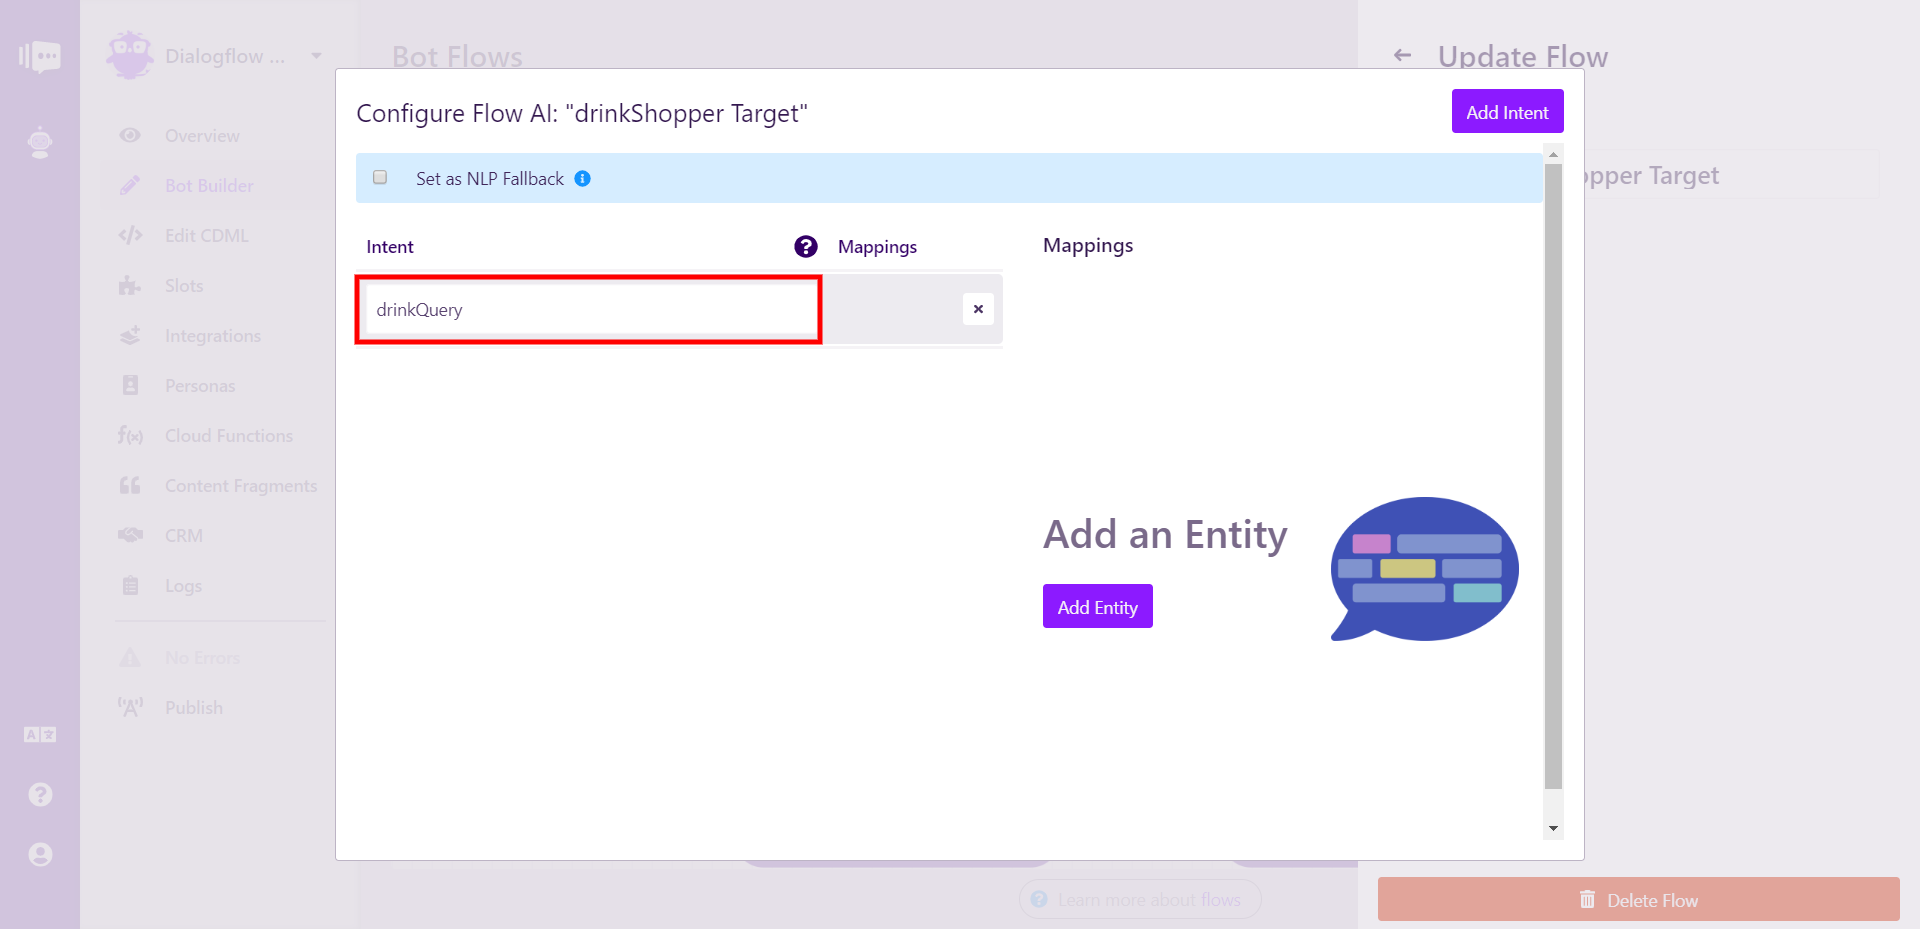 The Configure AI modal
We now want to add the intent. The important thing to keep in mind here is that this is case sensitive and requires an exact match.
Now we can do the same, mapping smalltalk.agent.marry_user to the flow called smalltalkMarry Target. Two of my flows have NLP mapped, and this shows in the graph view by turning the folders yellow and granting them the lightning bolt icon.
Please note that you can, and will at times want to, map multiple intents to one flow.
Mapping Entities
Now we need to do something about the entities. We want to collect all the data from our entities in order to send it to our API via Cloud Function or whatever else we want. That's where slots come in. Slots are where data is stored in Stackchat.
Let's create five slots to correspond to the five entities the NLP agent has.
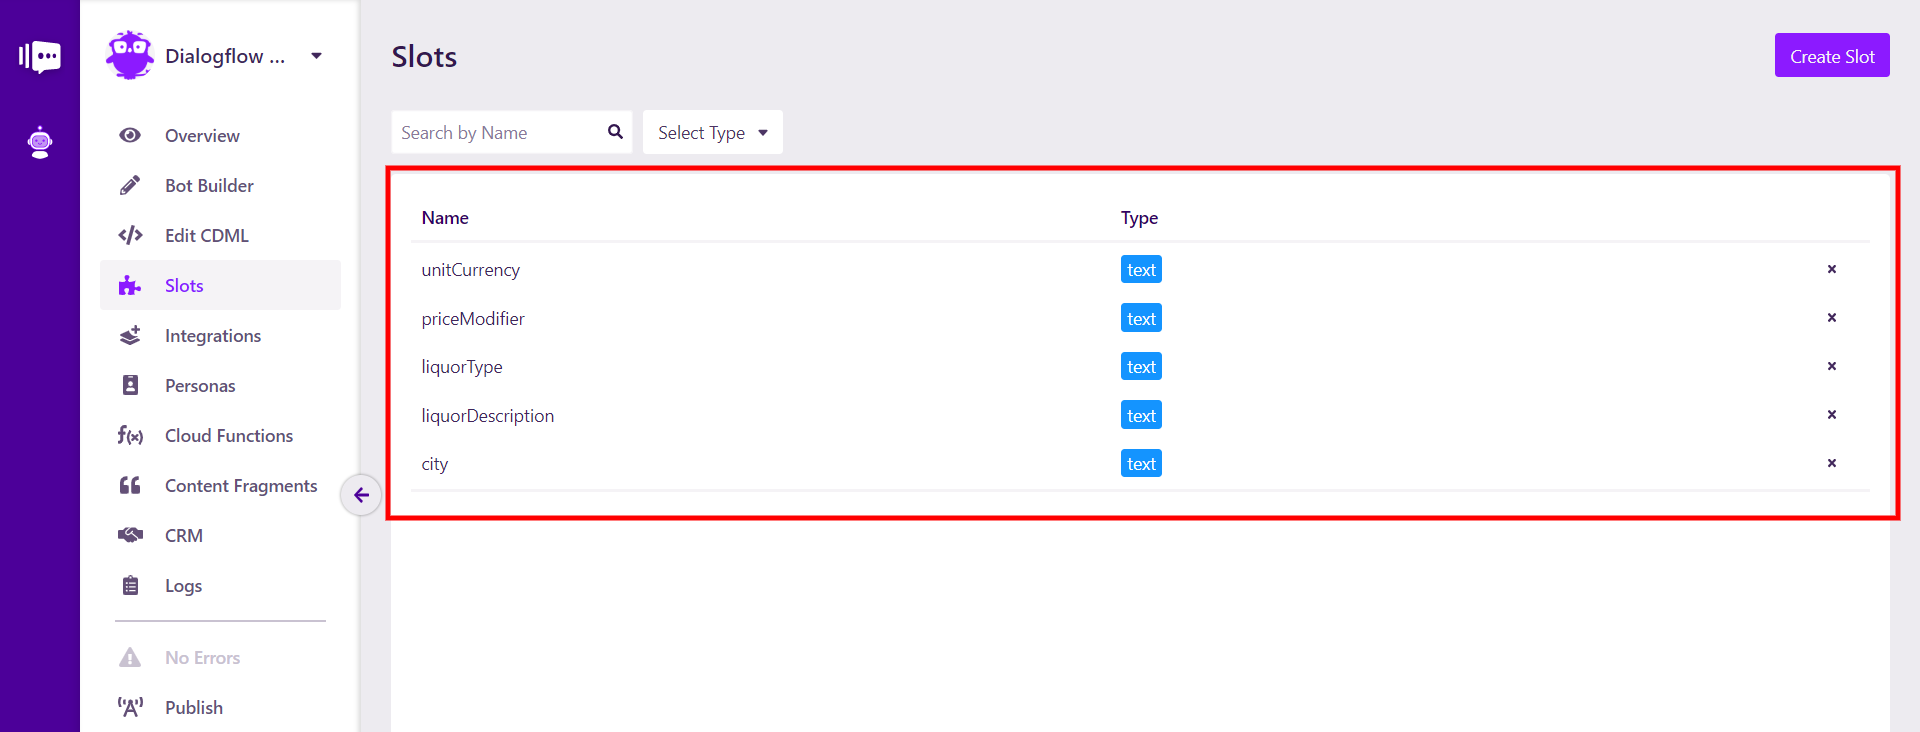 Five slots for five entities
Now that those five slots exist, we can map them to entities by returning to the drinkShopper Target flow AI configuration. Let's take a quick trip back to Dialogflow to make sure we get our entity names right, as these also require an exact match, and it may not immediately be obvious for system entities.
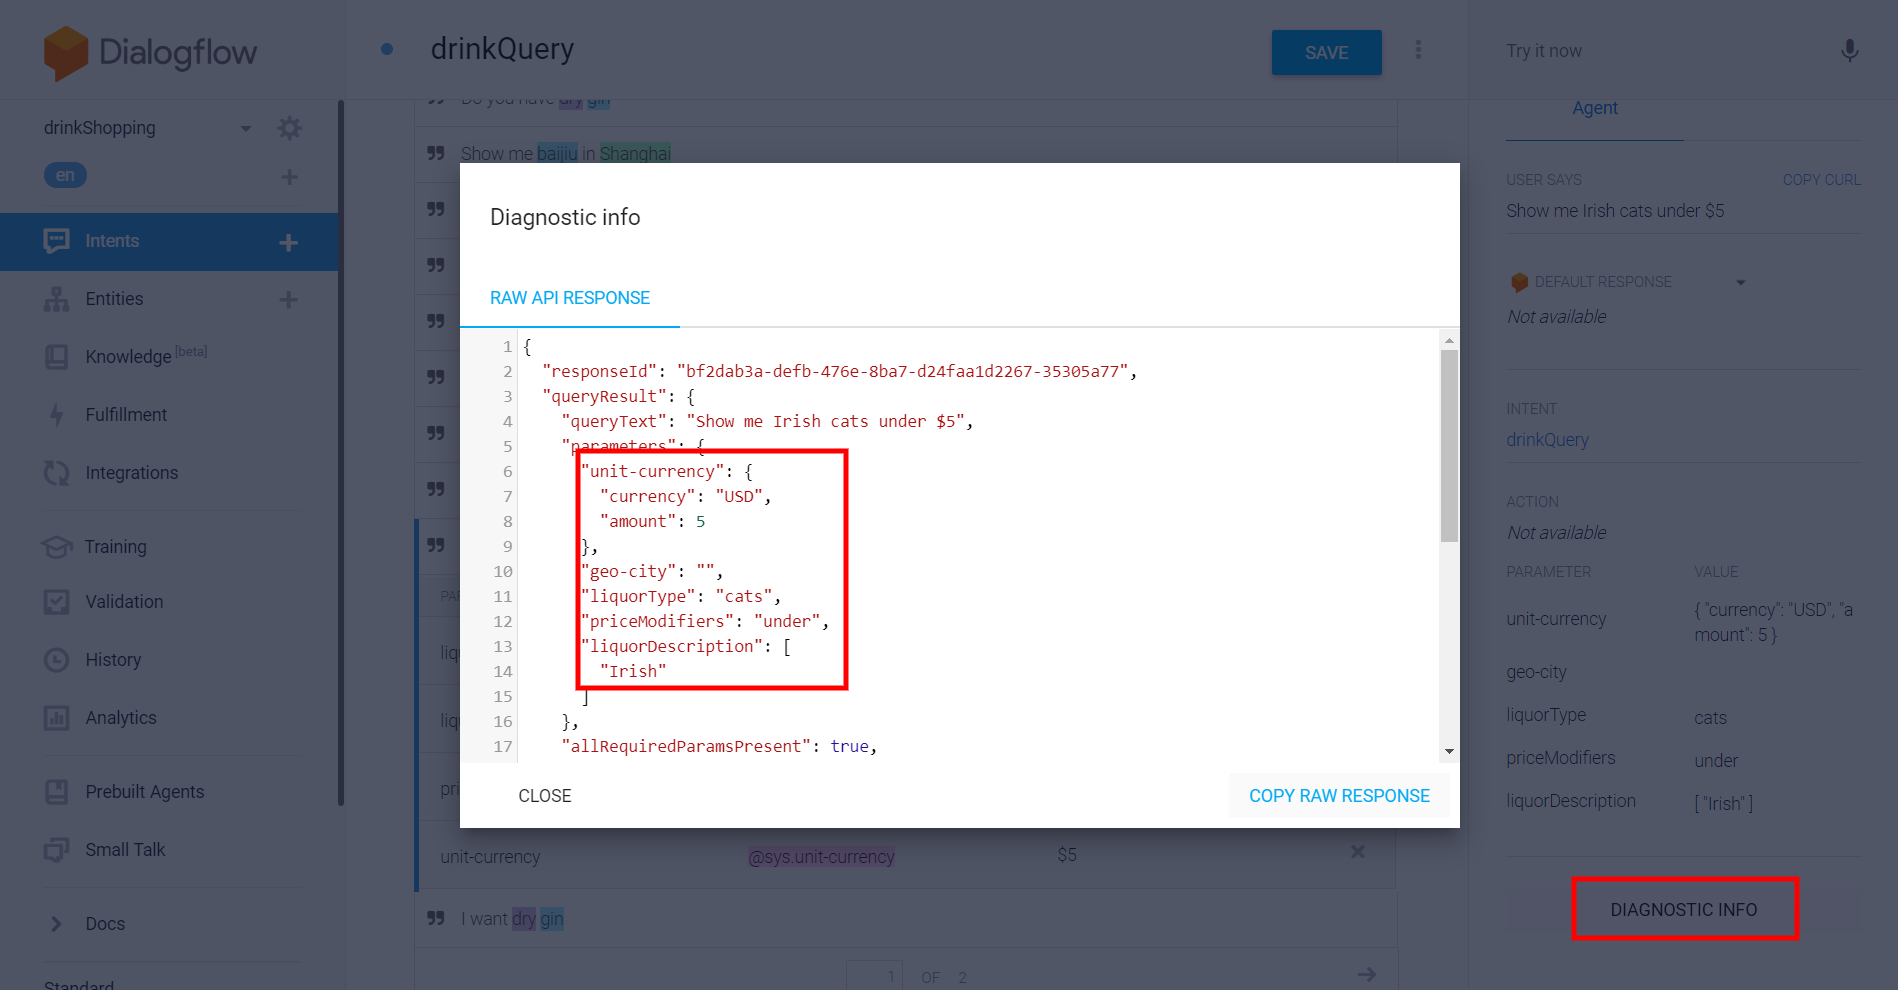 Automated expansion didn't go well here
The easiest way to see the is in the Diagnostic Info in the testing area as seen above. unit-currency is a bit different because it's a composite entity as some system entities are. We're going to need to format it as unit-currency.amount. We'll ignore the currency part for this guide, but it would be formatted as unit-currency.currency were we to use it.
All right! Now we have everything we need.
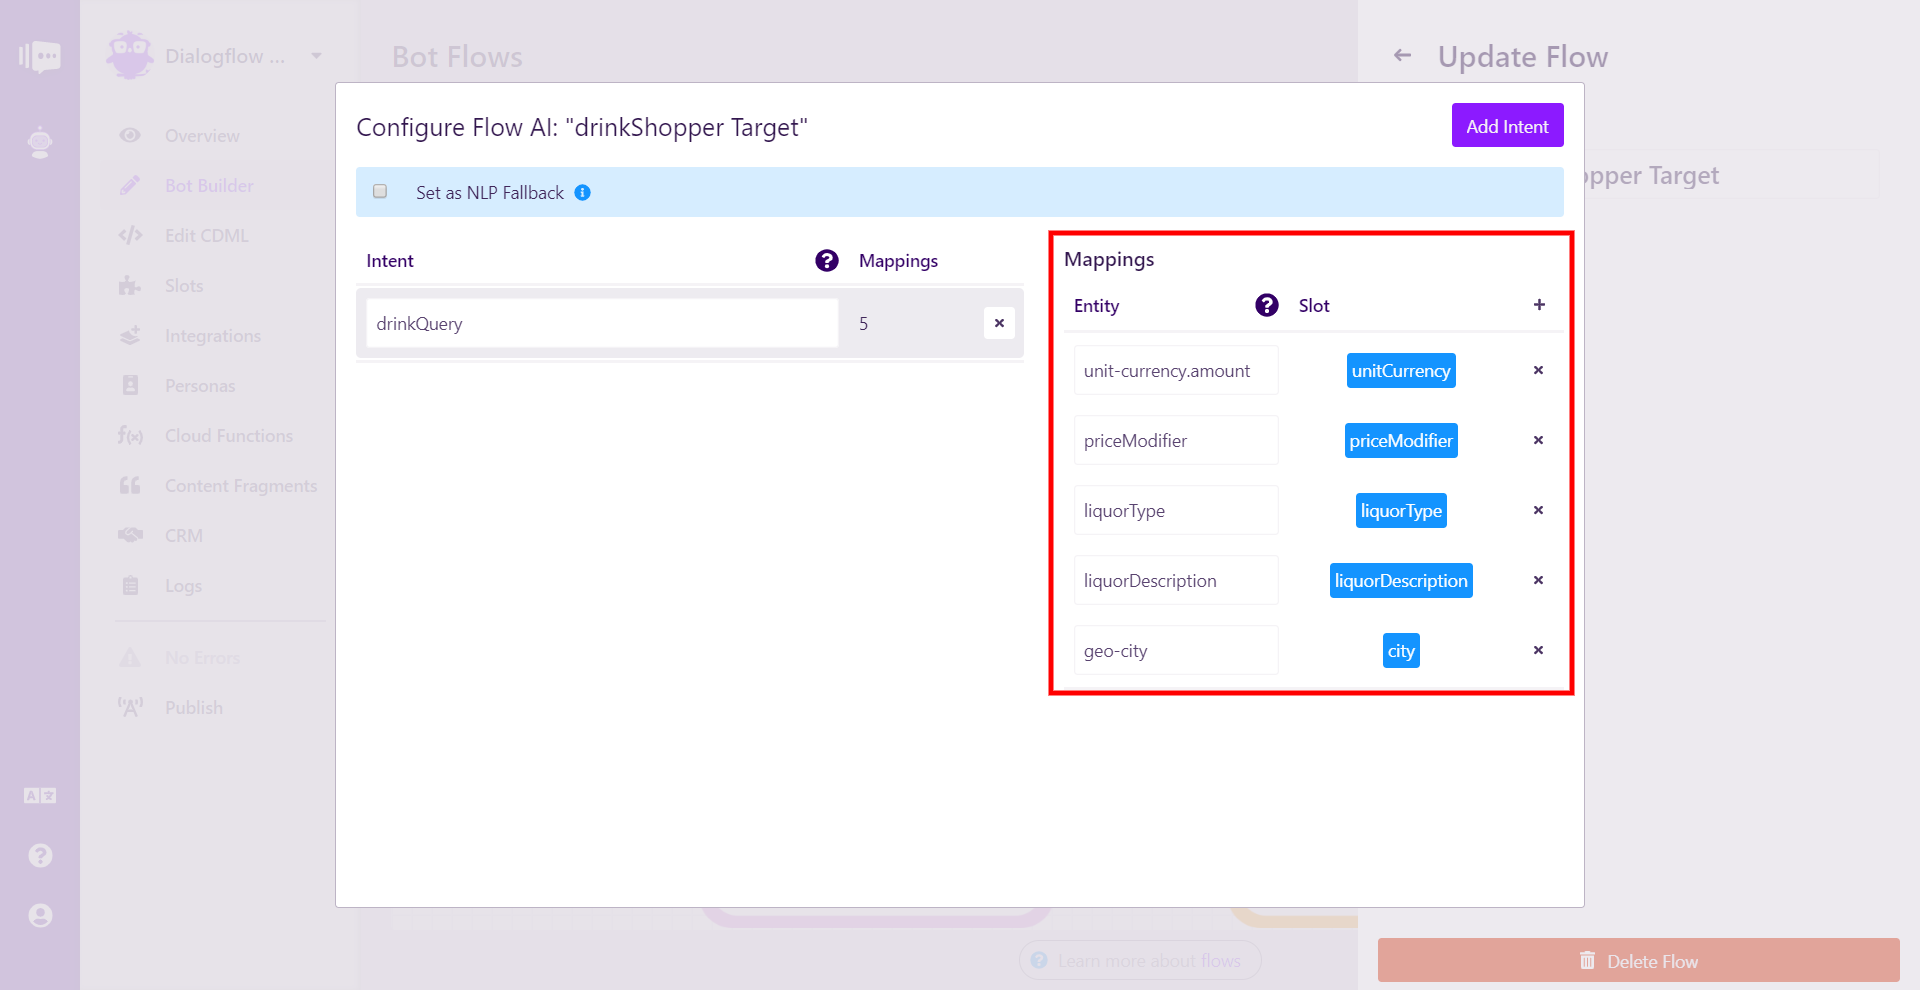 All five slots matched with their Dialogflow entities
Looking good! With a more complex agent with more intents and entities, you will need to do this for each intent that has entities.
NLP Fallback
One last step, and our bot is ready to rock. With NLP-driven bots, we need to do something with all the utterances that the agent just doesn't understand (or does understand but aren't mapped to our bot, like all those small talk intents in our agent). Stackchat has a built-in function for that.
Let's go into the right click menu for the NLP Fallback flow and then the Configure AI button.
All we need to do is click the button next to "Set as NLP Fallback".
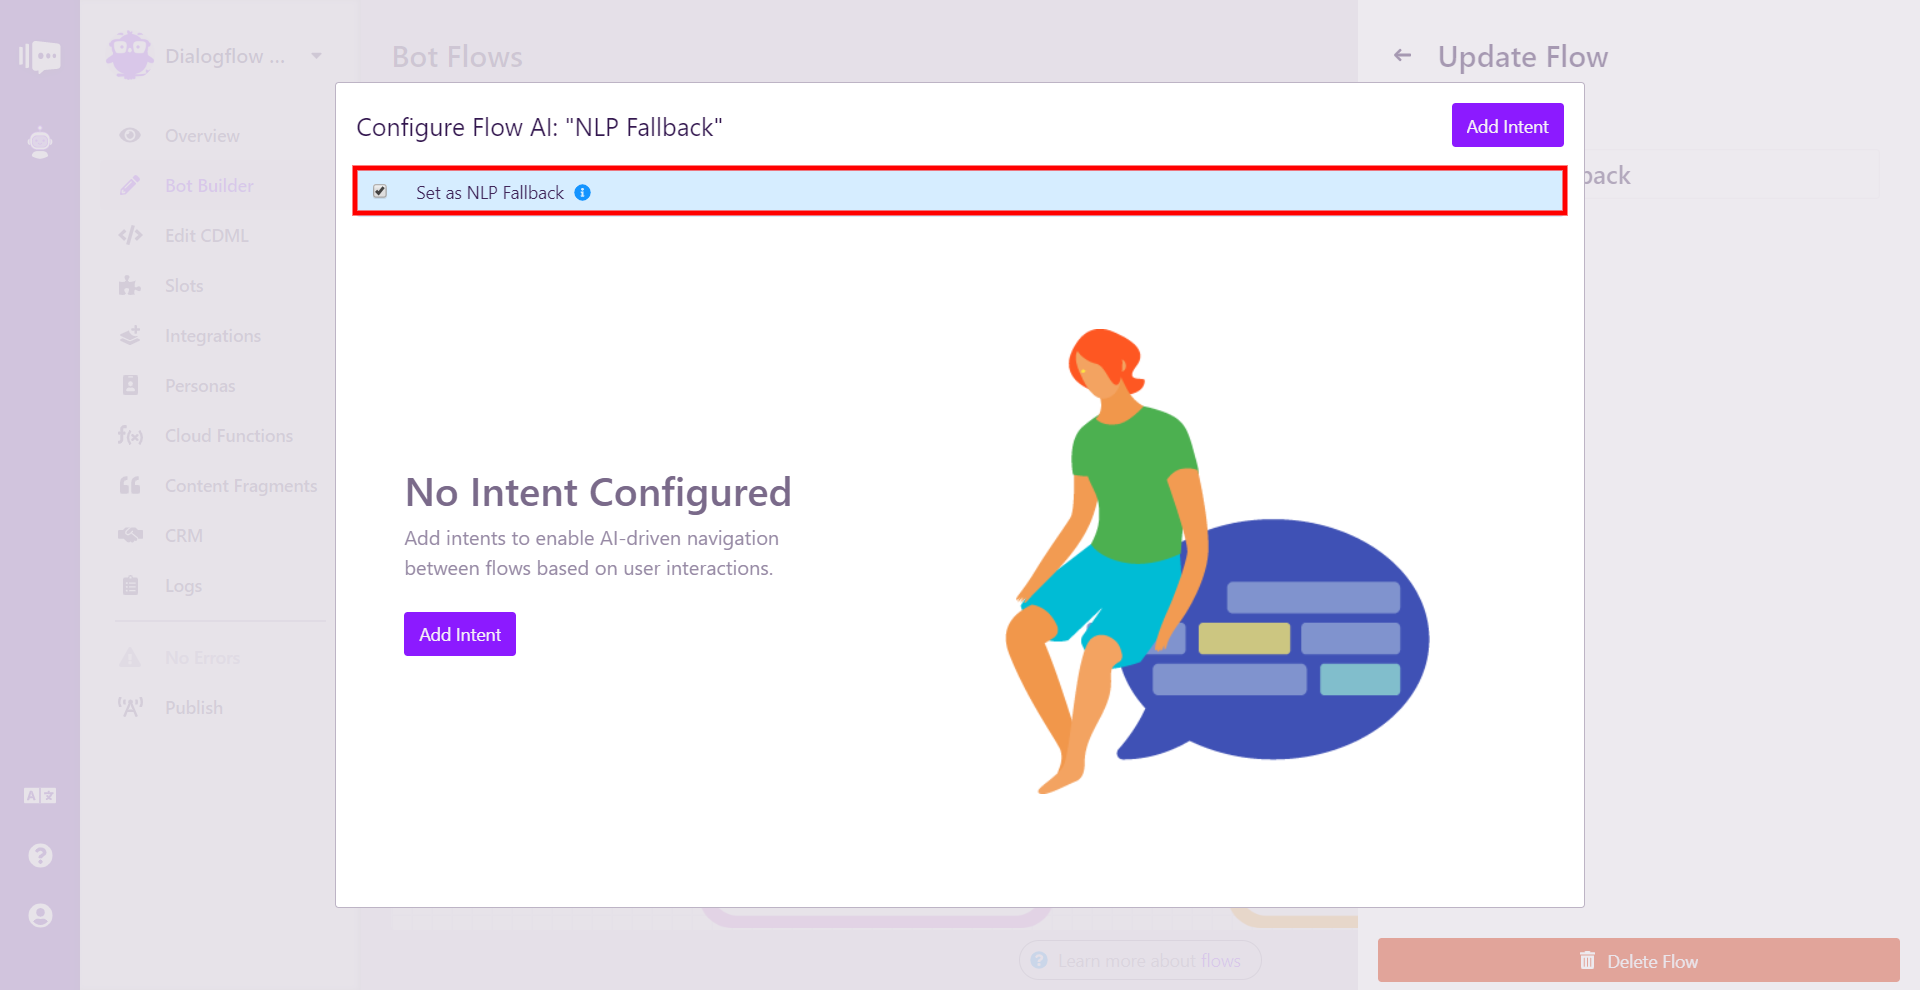 Setting the NLP fallback flow is about as easy as possible
And that's it! The flow has turned pink in graph view to reflect its status as the NLP Fallback flow. Let's publish the bot and see it in action.
Fully-Functional Bot with Dialogflow
Here's a look at the bot in graph view.
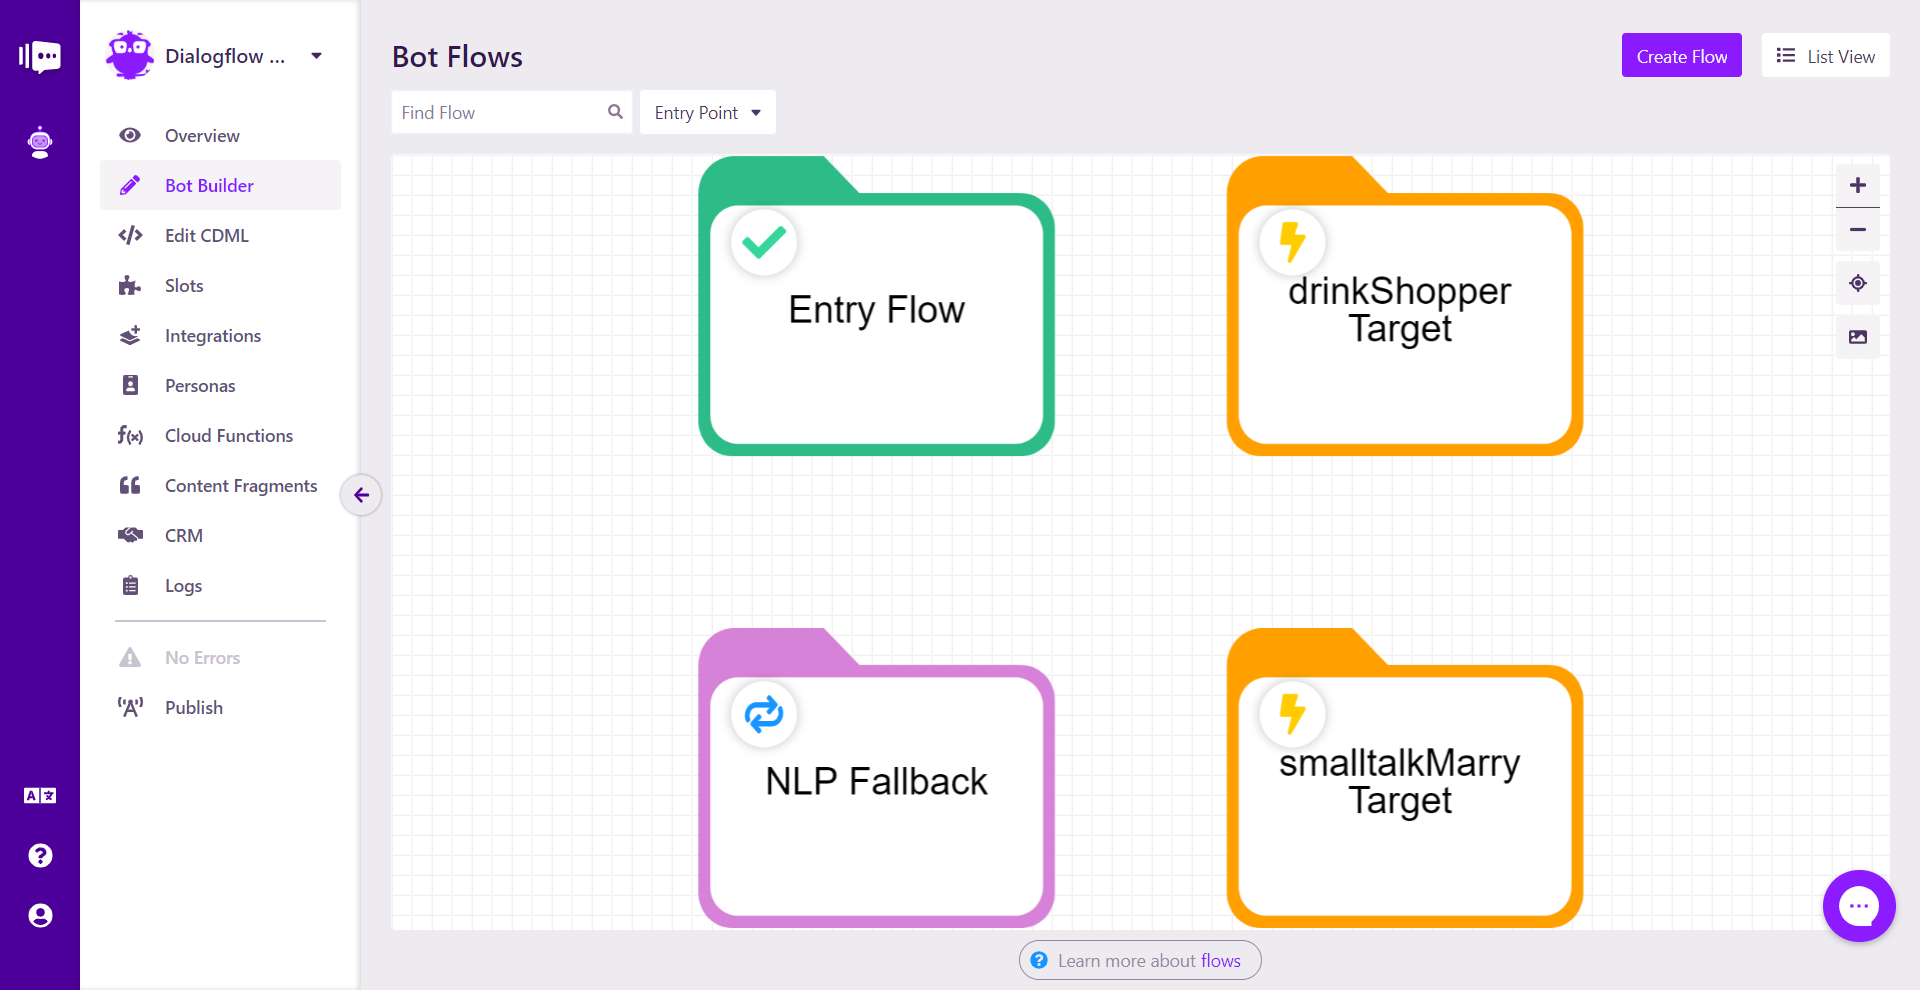 Four flow bot
There are only four flows:
- Entry Flow that responds to the first user utterance
- drinkShopper Target that responds to utterances picked up by the drinkQuery intent
- smalltalkMarry Target that responds to utterances picked up by the smalltalk.agent.marry_user intent
- NLP Fallback that responds to any other utterances
Here it is in action.
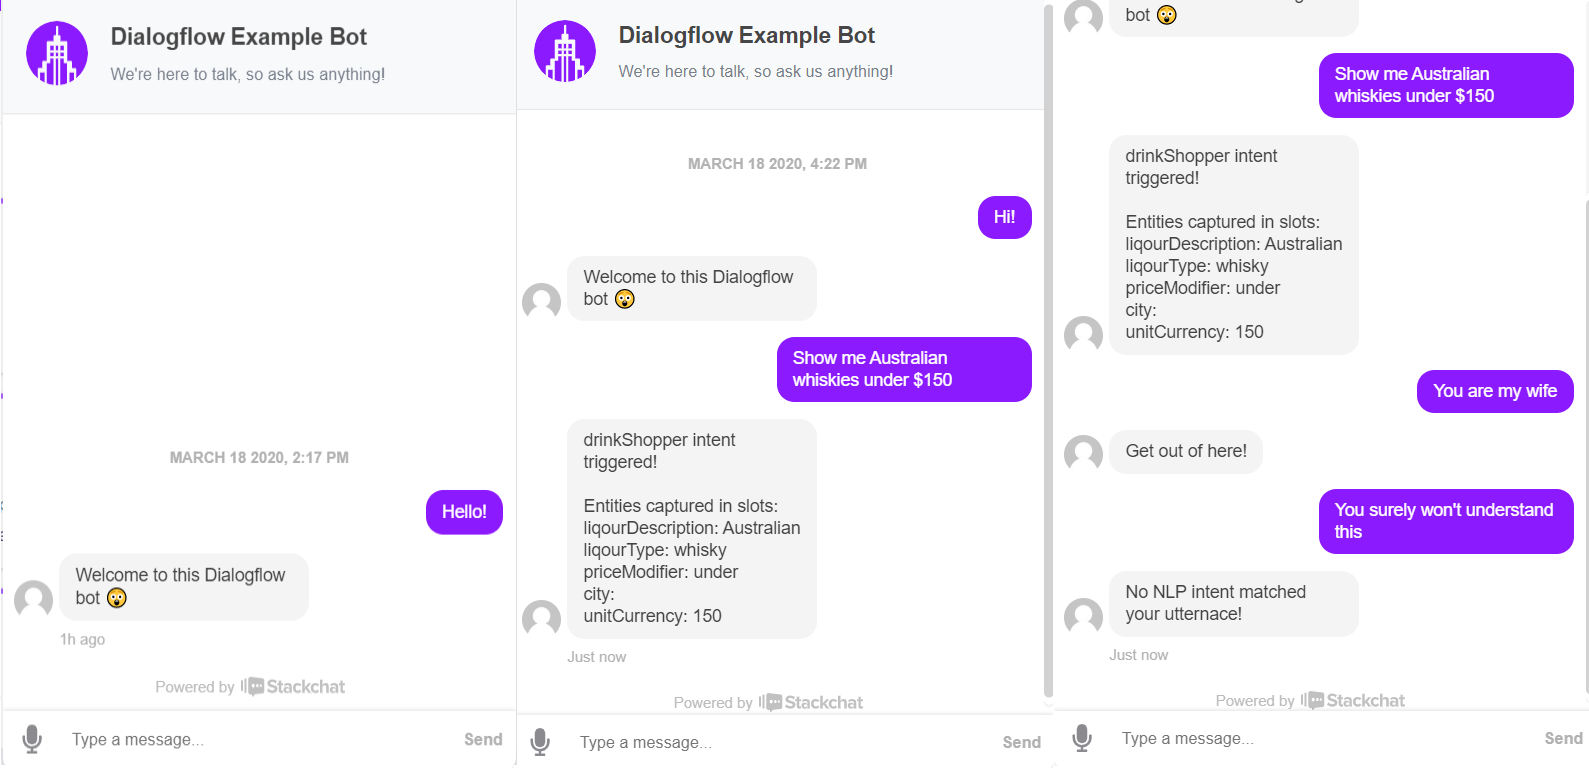 All functionality in the bot
As you can see, the bot was able to correct identify the two intents and fallback, and in the case of the drinkQuery intent, correctly pulled the entities into slots.
Hopefully, you're now ready to build an incredible NLP-driven bot with Stackchat and Dialogflow!