

Performance Testing With Puppeteer Cluster
Ever wished you could perform load testing against your infrastructure with an army of instances running actual web browsers?
Due to the shortcomings of traditional load testing tools for emulating actual real world traffic, we created a solution to do just that.
Rather than writing something ourselves, we assembled a rag-tag crew of existing tools; designed for other tasks, to put together a rough-around-the-edges but extremely useful solution.
The advantages of this approach:
- Holistically test and tune the entire platform, not just the parts you write tests for
- Accurately simulate real browser based traffic, downloading the whole app and all remote assets
- Hybrid functional/load testing capability, with the ability to log in and navigate and input data, regardless of the underlying technology stack
Lets look at how we put this together
Puppeteer
The core tool we are using is Puppeteer, a Node library which provides a high-level API to control Chrome or Chromium over the DevTools Protocol.
Puppeteer runs headless by default, but can be configured to run full (non-headless) Chrome or Chromium. Any Javascript library can be imported, making it incredibly powerful for interacting with Cloud providers via their SDK's.
You can even use a browser plugin such as Puppeteer Recorder to record website interactions and save them as a Puppeteer script! Functional testing doesn't get much easier.
Here is an example of a simple puppeteer script, which goes to https://stackchat.com/ and has a conversation with the bot then takes a screenshot:
Create stackChat.js Puppeteer script
1const puppeteer = require("puppeteer");2(async () => {3 const browser = await puppeteer.launch({ headless: false, slowMo: 50 });4 const page = await browser.newPage();56 const url = "https://stackchat.com/";7 const messengerFrameSelector = "#web-messenger-container";8 const messengerBubbleSelector = "#messenger-button";9 const messengerInputSelector = "#footer > form > div > textarea";10 const clickDelay = 3000;11 const waitTimeout = 5000;1213 const waitForResponse = async (frame, response) => {14 console.log(`Waiting for ${response}`);15 await frame.waitForFunction(16 `document.querySelector("body").innerText.includes("${response}")`17 );18 return;19 };2021 const sendMessage = async (inputSelector, message) => {22 console.log(`Type message ${message}`);23 await inputSelector.type(message);24 await inputSelector.press("Enter");25 return;26 };2728 const clickButton = async (frame, button) => {29 console.log(`Clicking button ${button}`);30 const buttonSelector = await messengerFrame.waitForSelector(31 `#conversation > div.messages-container > div > div.reply-container > button:nth-child(${button}) > span`32 );33 await buttonSelector.click();34 };3536 async function timeout(ms) {37 console.log(`Pause for ${ms / 1000} seconds`);38 return new Promise(resolve => setTimeout(resolve, ms));39 }4041 await page.goto(url);42 await page.setViewport({ width: 1024, height: 768 });43 let frames = await page.frames();44 console.log("get frame");45 console.log("get frame selector");46 await page.waitForSelector(messengerFrameSelector, {47 timeout: waitTimeout48 });49 const messengerFrameContainer = await page.$(messengerFrameSelector);50 const messengerFrame = await messengerFrameContainer.contentFrame();51 const messengerBubble = await messengerFrame.waitForSelector(52 messengerBubbleSelector,53 {54 timeout: waitTimeout55 }56 );57 console.log("Page and Messenger ready");58 console.log("Wait for messenger input");59 await messengerBubble.click();60 let messageInput = await messengerFrame.waitForSelector(61 messengerInputSelector,62 {63 timeout: waitTimeout64 }65 );6667 await sendMessage(messageInput, "Hello");68 await waitForResponse(messengerFrame, "What do you think?");69 await timeout(clickDelay);70 await clickButton(messengerFrame, 1);71 await waitForResponse(messengerFrame, "What should l call you?");72 await sendMessage(messageInput, "Tony Harrison");73 await timeout(clickDelay * 2);74 await clickButton(messengerFrame, 2);7576 // Create an array of known messenger responses to react to77 responses = [78 "hear about the features?",79 "Sounds pretty cool, huh?",80 "Still following?",81 "integrating social channels",82 "AI capabilities?",83 "following along alright?",84 "Sound good?",85 "a sneaky feature?",86 "competitors basic bots!"87 ];8889 for (const response of responses) {90 await waitForResponse(messengerFrame, response);91 await timeout(clickDelay);92 await clickButton(messengerFrame, 1);93 }9495 await waitForResponse(messengerFrame, "to do next?");96 await timeout(2000);97 console.log("Taking screenshot and exiting");98 await page.screenshot({ path: "screenshot.png" });99 await browser.close();100})();101
Install puppeteer and run script:
1npm i puppeteer2node stackChat.js3

Click Neither of these at the end before it times out, it will take a screenshot and exit.
Pretty cool huh?
Puppeteer Cluster
The next layer of the stack is Puppeteer Cluster, a library that spawns a pool of Chromium instances via Puppeteer and helps to keep track of jobs and errors. This is helpful if you want to crawl multiple pages or run tests in parallel.
Lets take our previous script and update it to run on a cluster of 10 Chrome instances
We have removed the pauses and logging, as we won't be watching individual progress of nodes
1const { Cluster } = require("puppeteer-cluster");2(async () => {3 //Create cluster with 10 workers4 const cluster = await Cluster.launch({5 concurrency: Cluster.CONCURRENCY_CONTEXT,6 maxConcurrency: 10,7 monitor: true,8 timeout: 5000009 });1011 // Print errors to console12 cluster.on("taskerror", (err, data) => {13 console.log(`Error crawling ${data}: ${err.message}`);14 });1516 // Dumb sleep function to wait for page load17 async function timeout(ms) {18 return new Promise(resolve => setTimeout(resolve, ms));19 }2021 await cluster.task(async ({ page, data: url, worker }) => {22 // const browser = await puppeteer.launch({ headless: false, slowMo: 50 });23 // const page = await browser.newPage();2425 const messengerFrameSelector = "#web-messenger-container";26 const messengerBubbleSelector = "#messenger-button";27 const messengerInputSelector = "#footer > form > div > textarea";28 const clickDelay = 3000;29 const waitTimeout = 5000;3031 const waitForResponse = async (frame, response) => {32 await frame.waitForFunction(33 `document.querySelector("body").innerText.includes("${response}")`34 );35 return;36 };3738 const sendMessage = async (inputSelector, message) => {39 await inputSelector.type(message);40 await inputSelector.press("Enter");41 return;42 };4344 const clickButton = async (frame, button) => {45 const buttonSelector = await messengerFrame.waitForSelector(46 `#conversation > div.messages-container > div > div.reply-container > button:nth-child(${button}) > span`47 );48 await buttonSelector.click();49 };5051 async function timeout(ms) {52 return new Promise(resolve => setTimeout(resolve, ms));53 }5455 await page.goto(url);56 await page.setViewport({ width: 1024, height: 768 });57 let frames = await page.frames();58 await page.waitForSelector(messengerFrameSelector, {59 timeout: waitTimeout60 });61 const messengerFrameContainer = await page.$(messengerFrameSelector);62 const messengerFrame = await messengerFrameContainer.contentFrame();63 const messengerBubble = await messengerFrame.waitForSelector(64 messengerBubbleSelector,65 {66 timeout: waitTimeout67 }68 );69 await messengerBubble.click();70 let messageInput = await messengerFrame.waitForSelector(71 messengerInputSelector,72 {73 timeout: waitTimeout74 }75 );7677 await sendMessage(messageInput, "Hello");78 await waitForResponse(messengerFrame, "What do you think?");79 await clickButton(messengerFrame, 1);80 await waitForResponse(messengerFrame, "What should l call you?");81 await sendMessage(messageInput, "Tony Harrison");82 await clickButton(messengerFrame, 2);8384 // Create an array of known messenger responses to react to85 responses = [86 "hear about the features?",87 "Sounds pretty cool, huh?",88 "Still following?",89 "integrating social channels",90 "AI capabilities?",91 "following along alright?",92 "Sound good?",93 "a sneaky feature?",94 "competitors basic bots!"95 ];9697 for (const response of responses) {98 await waitForResponse(messengerFrame, response);99 await clickButton(messengerFrame, 1);100 }101102 await page.screenshot({ path: `screenshot${worker.id}.png` });103 await page.screenshot({ path: "screenshot.png" });104 });105106 for (let i = 1; i <= 10; i++) {107 cluster.queue("https://stackchat.com/");108 }109 await cluster.idle();110 await cluster.close();111})();112
1npm i puppeteer-cluster2node stackChat.js3
You should now have ten screenshots. Very cool!
You will notice we used were able to use language features; such as arrays, loops and functions. This full language support makes this a very powerful solution. For our testing we are able to use Javascript libraries, such as the AWS SDK, within our tests, which makes this much more flexible than traditional DSL based solutions. It is also more flexible and powerful in many ways than modern tools such as k6, which supports tests written in Javascript, but not the full Node/NPM ecosystem.
As the next three layers require more setup than would make sense to outline here, we will look at them as a group and provide code examples.
Docker
Docker Engine enables containerized applications to run anywhere consistently on any infrastructure, solving “dependency hell” for developers and operations teams, and eliminating the “it works on my laptop!” problem.
Ansible
Ansible is the simplest way to automate apps and IT infrastructure. Application Deployment + Configuration Management + Continuous Delivery.
Buildkite
Buildkite is a platform for running fast, secure, and scalable continuous integration pipelines on your own infrastructure
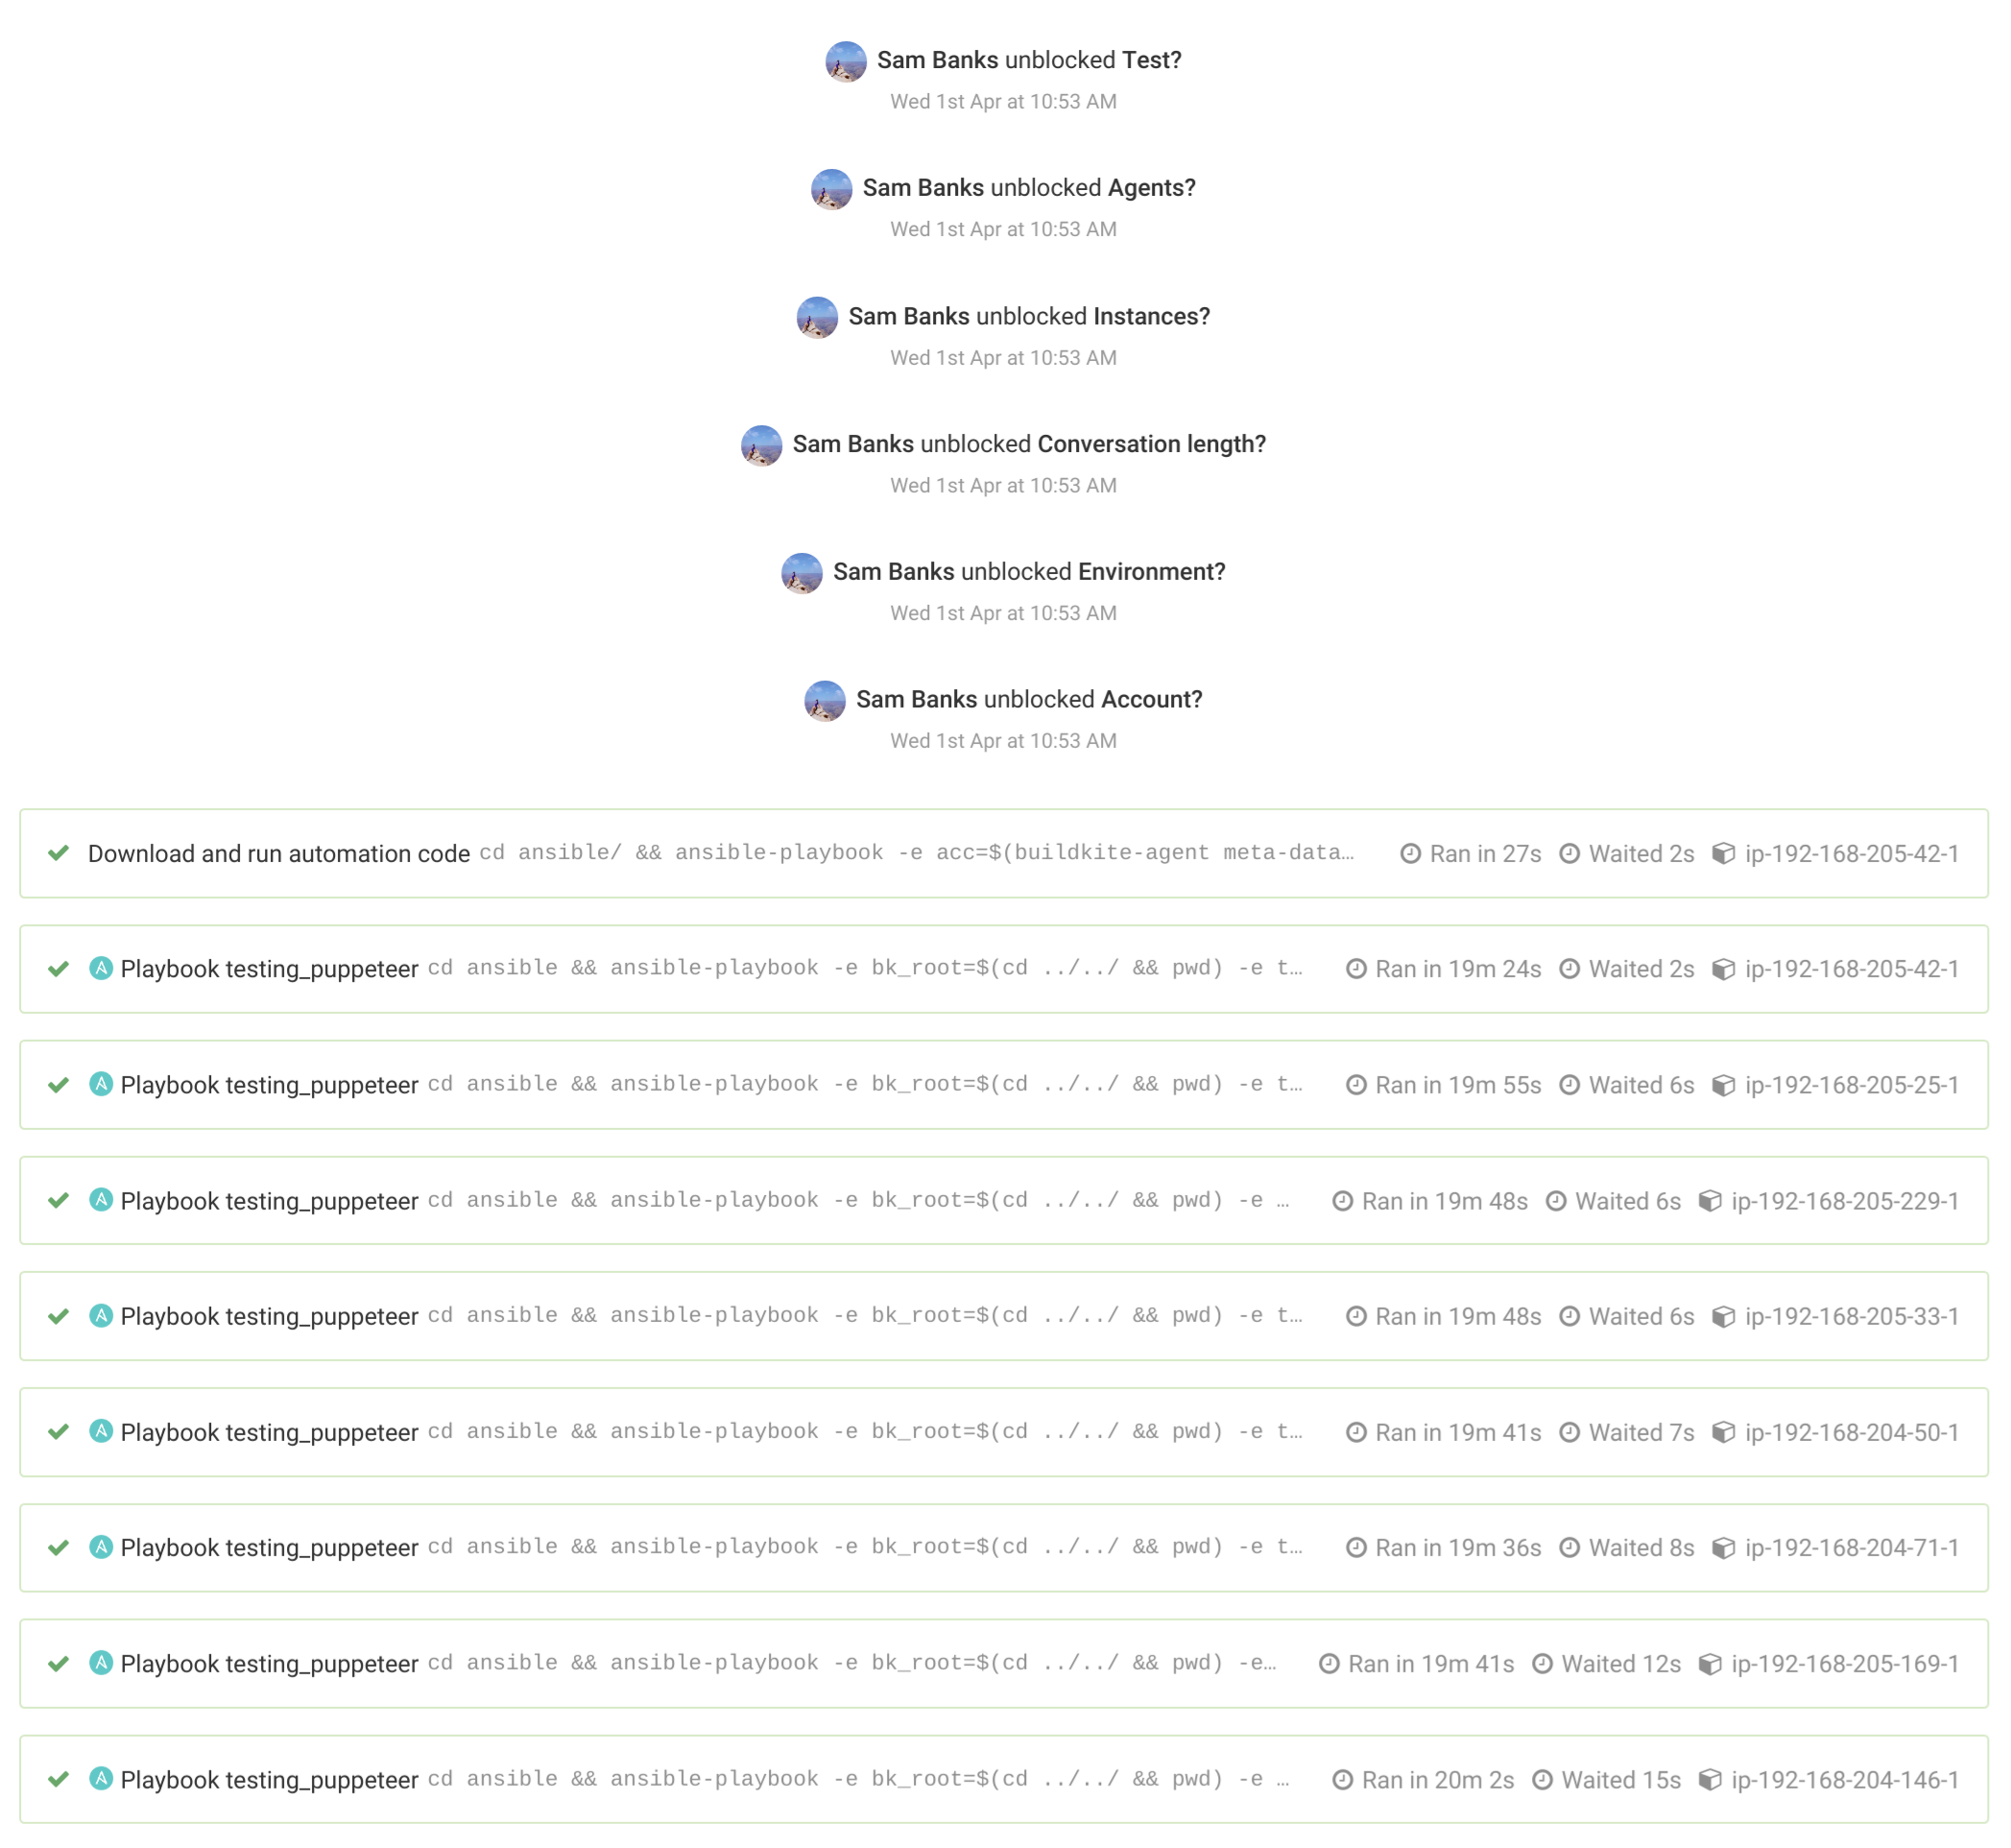
The Buildkite pipeline that takes several input variables and triggers Ansible, passing the values in as extra vars
1steps:2 - block: Test?3 prompt: Please enter the test suite to run4 fields:5 - select: Tests?6 key: test_file7 options:8 - label: Chat Bot Conversation9 value: chatbot10 - label: Website Load test11 value: website1213 - block: Agents?14 prompt: Please enter the amount of agents15 fields:16 - text: Agents?17 key: testing_agents1819 - block: Instances?20 prompt: Please enter the amount of chrome instances per agent21 fields:22 - text: Instances?23 key: testing_concurrency2425 - block: Length?26 prompt: Please enter the amount of messages in the conversation, or the amount of sequential hits27 fields:28 - text: Conversation Length?29 key: testing_conversation_length3031 - block: Environment?32 prompt: Please select the desired environment33 Integration, Prd, etc.34 fields:35 - text: Environment?36 key: env3738 - block: Account?39 prompt: Please enter the AWS account40 dev, prd, etc.41 fields:42 - select: Account?43 key: acc44 options:45 - label: prd_au46 value: prd_au47 - label: prd_cn48 value: prd_cn49 - label: stg_au50 value: stg_au51 - label: dev_au52 value: dev_au5354 - label: Download and run automation code55 command: cd ansible/ &&56 ansible-playbook57 -e acc=$(buildkite-agent meta-data get "acc")58 -e env=$(buildkite-agent meta-data get "env")59 -e test_file=$(buildkite-agent meta-data get "test_file")60 -e testing_agents=$(buildkite-agent meta-data get "testing_agents")61 -e testing_concurrency=$(buildkite-agent meta-data get "testing_concurrency")62 -e testing_conversation_length=$(buildkite-agent meta-data get "testing_conversation_length")63 -e parent_job=${BUILDKITE_JOB_ID}64 -e product=test65 meta_testing.yml66 retry:67 automatic:68 - exit_status: -1 # Agent was lost69 limit: 270 - exit_status: 255 # Forced agent shutdown71 limit: 272 - exit_status: 2 # Docker connection aborted73 limit: 274
This triggers a wrapper playbook, which we call a meta playbook, as it dynamically creates new Buildkite jobs, based on the testing_concurrency value entered in Buildkite.
The Ansible meta_testing.yml playbook
1---2- hosts: all3 gather_facts: true4 roles:5 - role: add_groups6 inventories:7 - "{{acc}}"8 - puppeteer_results9 - role: dynamic_testing_pipelines10 playbook: testing_puppeteer11 testing_agents: "{{testing_agents}}"12 extra_vars:13 - key: test_file14 value: "{{test_file}}"15 - key: acc16 value: "{{acc}}"17 - key: env18 value: "{{env}}"19 - key: testing_concurrency20 value: "{{testing_concurrency}}"21 - key: testing_agents22 value: "{{testing_agents}}"23 - key: testing_conversation_length24 value: "{{testing_conversation_length}}"25 - key: product26 value: test27 - key: parent_job28 value: "{{parent_job}}"2930
The dynamic_testing_pipelines role, which creates a pipeline file for each job and uploads it to the currently running Buildkite pipeline
1- name: Create {{playbook}} pipeline2 copy:3 dest: "{{playbook}}-pipeline.yml"4 content: |5 steps:6 - label: ':ansible: Playbook {{playbook}}'7 retry:8 automatic:9 - exit_status: -1 # Agent was lost10 limit: 211 - exit_status: 255 # Forced agent shutdown12 limit: 213 command:14 cd ansible &&15 ansible-playbook16 -e bk_root=$(cd ../../ && pwd)17 {% for var in extra_vars %}18 -e {{var.key}}={{var.value}}19 {% endfor %}20 {% endif %}21 {{playbook}}.yml2223- name: Upload template as artifact24 shell: buildkite-agent artifact upload {{playbook}}.yml2526- name: Upload {{playbook}} pipeline27 shell: buildkite-agent pipeline upload28 {{playbook}}-pipeline.yml29 loop: "{{range(0, testing_agents|int)|list}}"30
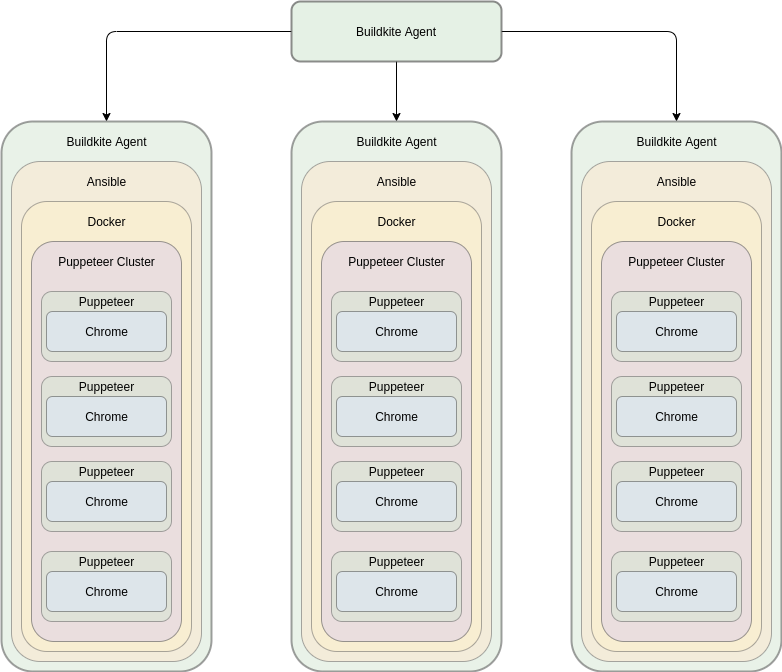
In this example we have chosen to run 10 instances of chrome on 10 different Buildkite agents.
Each agent runs the following playbook
1---2- hosts: all3 gather_facts: true4 roles:5 - add_groups6 - aws_sts_assume_role7 - get_facts8 - puppeteer_test9
The puppeteer_test role creates a docker container container based on the Buildkite puppeteer public image in docker hub. It then installs puppeteer-cluster, and runs the selected Javascript test file.
After cleaning up the container, it uses the Buildkite CLI to upload the results to the parent Buildkite pipeline.
The puppeteer_test role
1---2- name: Register facts3 set_fact:4 "{{item.key}}": "{{item.value}}"5 with_items:6 - key: working_dir7 value: "{{ansible_env.BUILDKITE_BUILD_CHECKOUT_PATH}}"8 - key: container_name9 value: "{{repo|lower+'-'+branch+'-'+ansible_env.BUILDKITE_BUILD_NUMBER}}"1011- name: Template test files12 template:13 src: "{{item}}"14 dest: "{{item|regex_replace('.j2')}}"15 loop:16 - "{{test_file}}.js.j2"17 - "package.json.j2"1819- name: Create dockerfile20 copy:21 content: |22 FROM buildkite/puppeteer23 RUN useradd -u 999 -m -d /home/buildkite-agent buildkite-agent24 dest: Dockerfile2526- name: Create docker image27 docker_image:28 name: "{{container_name}}"29 source: build30 build:31 path: ./32 pull: yes3334- name: Docker - Set ownership of buildkite working dir35 docker_container:36 name: "{{container_name}}"37 image: "{{container_name}}"38 detach: no39 env: "{{node_build_env}}"40 volumes:41 - "{{working_dir}}:/buildkite"42 working_dir: /buildkite43 command: chown -R buildkite-agent .44 register: chown_dir45 when: chown_dir is not defined4647- name: Docker - NPM install48 docker_container:49 name: "{{container_name}}"50 image: "{{container_name}}"51 detach: no52 env: "{{node_build_env}}"53 volumes:54 - "{{working_dir}}:/buildkite"55 working_dir: /buildkite/ansible56 entrypoint: npm install57 user: buildkite-agent58 register: npm_install5960- name: Docker - Run puppeteer-cluster61 docker_container:62 name: "{{container_name}}"63 image: "{{container_name}}"64 detach: no65 volumes:66 - "{{working_dir}}:/buildkite"67 working_dir: /buildkite/ansible68 command: node {{test_file}}.js69 user: buildkite-agent70 register: test_output7172- name: Show test output73 debug:74 msg: "{{test_output.ansible_facts.docker_container.Output}}"7576- name: Remove containers77 docker_container:78 name: "{{item}}"79 state: absent80 loop:81 - "{{container_name}}"8283- name: Upload results as artifacts84 shell: buildkite-agent artifact upload85 --job {{parent_job}} {{item}}86 loop:87 - "errors_{{ansible_env.BUILDKITE_JOB_ID}}.json"88 - "results_{{ansible_env.BUILDKITE_JOB_ID}}.json"89 register: output90
Once all the agents have finished testing, the download artifacts pipeline will download and combine all the results and error files and compile them into an HTML report and upload it to Buildkite as an artifact.
puppeteer_results Buildkite pipeline
1---2- name: Generate artifact download pipeline3 copy:4 dest: pipeline.yml5 content: |6 steps:7 - wait: ~8 continue_on_failure: true910 - label: Download artifacts11 key: results12 command: cd ansible && ansible-playbook13 -e acc=$(buildkite-agent meta-data get "acc")14 -e env=$(buildkite-agent meta-data get "env")15 -e parent_job={{parent_job}}16 -e product=test17 testing_results.yml18 retry:19 automatic:20 - exit_status: -1 # Agent was lost21 limit: 222 - exit_status: 255 # Forced agent shutdown23 limit: 22425- name: Upload pipeline26 shell: buildkite-agent pipeline upload pipeline.yml27
testing_results.yml Ansible playbook
1---2- hosts: all3 gather_facts: true4 roles:5 - add_groups6 - aws_sts_assume_role7 - get_facts8 - results_display9
results_display Ansible role
1---2- name: Download testing results from parent job3 command: buildkite-agent artifact download4 "*.json" .5 --step "{{parent_job}}"6 --build "{{ansible_env.BUILDKITE_BUILD_ID}}"78- name: Instantiate arrays9 set_fact:10 results_array: []11 errors_array: []1213- name: Read results into array14 set_fact:15 results_array: "{{results_array+(lookup('file', item)|from_json)}}"16 with_fileglob:17 - "{{playbook_dir}}/results*"1819- name: Read errors into array20 set_fact:21 errors_array: "{{errors_array+(lookup('file', item)|from_json)}}"22 with_fileglob:23 - "{{playbook_dir}}/errors*"2425- debug:26 var: errors_array2728- name: Generate test html file29 template:30 dest: results.html31 src: results.html.j23233- name: Upload results34 shell: buildkite-agent artifact upload results.html35
results.html.j2
1<html>2 <head>3 <!--Load the AJAX API-->4 <script5 type="text/javascript"6 src="https://www.gstatic.com/charts/loader.js"7 ></script>8 <script type="text/javascript">910 // Load the Visualization API and the corechart package.11 google.charts.load('current', {'packages':['scatter', 'table']});1213 // Set callbacks to run when the Google Visualization API is loaded.14 google.charts.setOnLoadCallback(drawResultsChart);15 google.charts.setOnLoadCallback(drawTable);1617 // Draw Charts18 function drawResultsChart() {19 var data = new google.visualization.DataTable();2021 data.addColumn('number', 'Timeline (Milliseconds)');22 data.addColumn('number', 'Duration (Milliseconds)');23 data.addRows({{results_array|to_json}});2425 var options = {'title':'Results', 'height': 1200};26 var chart = new google.charts.Scatter(document.getElementById('results_chart_div'));2728 chart.draw(data, options);29 }3031 function drawTable() {32 var data = new google.visualization.DataTable();33 data.addColumn('number', 'Timeline (Milliseconds)');34 data.addColumn('string', 'Error Message');35 data.addRows({{errors_array|to_json}});3637 var table = new google.visualization.Table(document.getElementById('table_div'));3839 table.draw(data, {showRowNumber: true, width: '100%', height: '100%'});40 }4142 </script>43 </head>4445 <body>46 <h1>Successful Requests</h1>47 <div id="results_chart_div"></div>48 <h1>Errors</h1>49 <div id="table_div"></div>50 </body>5152</html>53
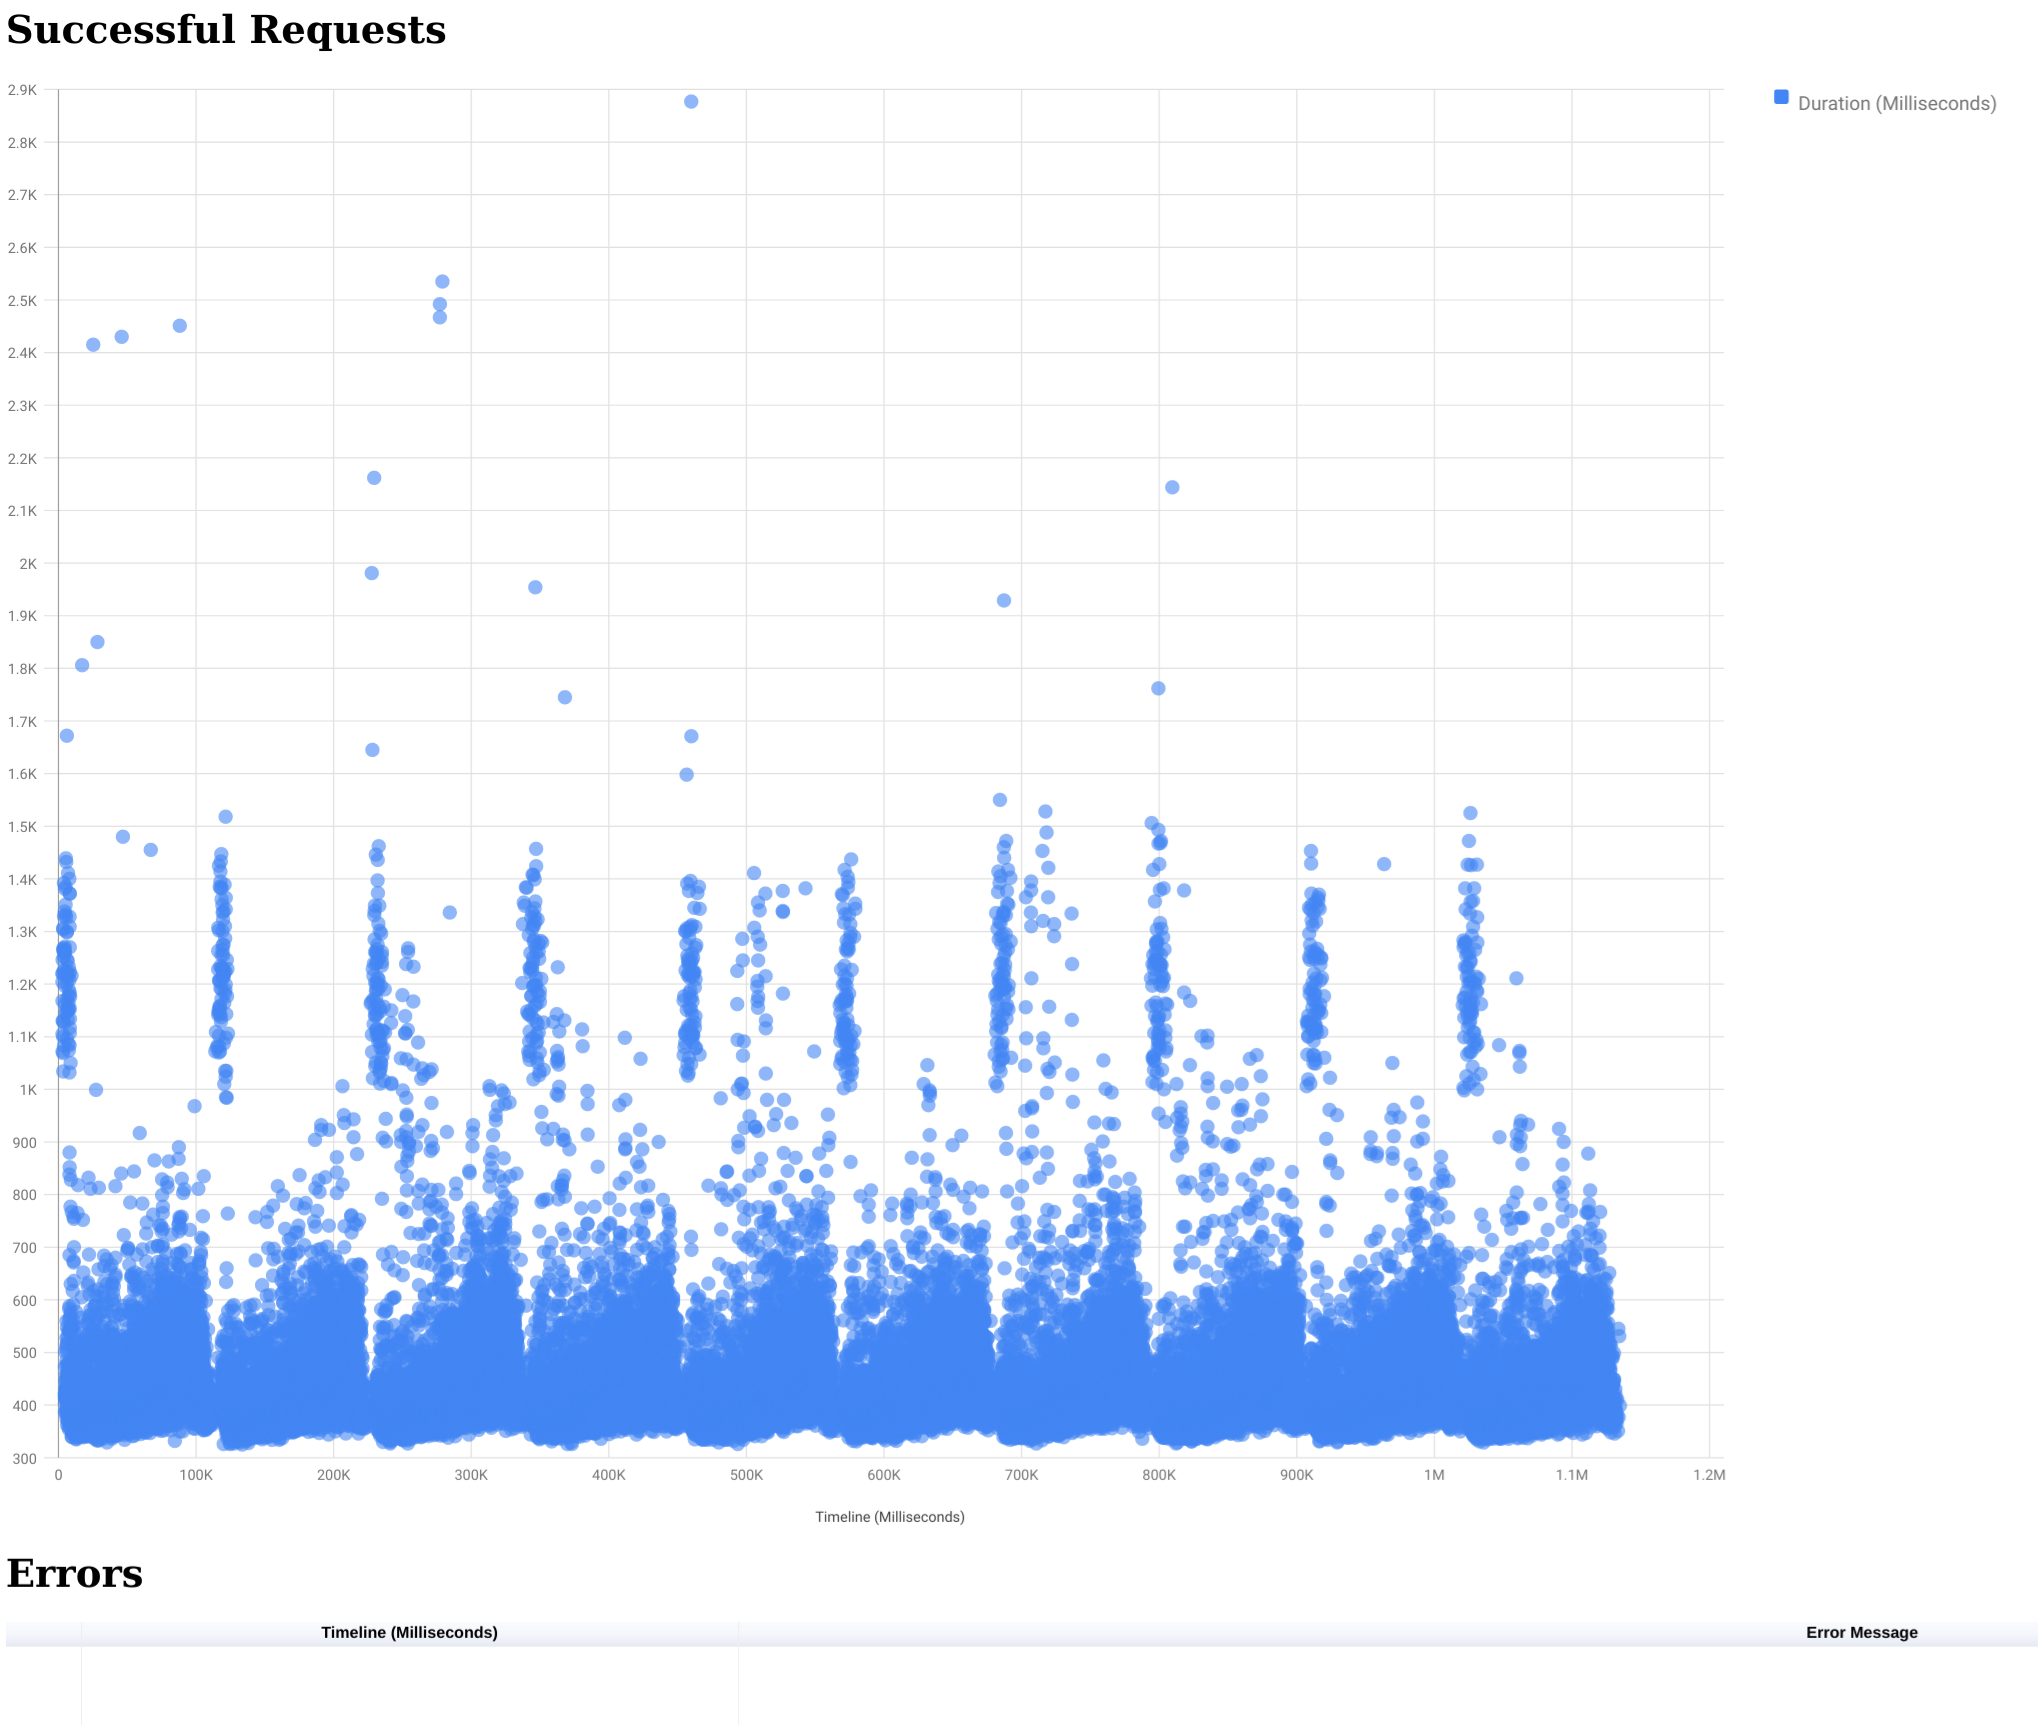
And this will spit out the following report

This worked great for us and allowed us to track down and resolve several issues in our infrastructure, that were preventing us from getting the performance we were expecting from our dynamically scalable Serverless infrastructure design.
Once we had resolved those issues though and wanted to see what the platform could really do, we ran into an issue that fell into the nice-problem-to-have category. Now that we had realized the incredible scaling possibilities of a fully Serverless Microservice architecture, we were generating more results than our build agents could handle.
We running tried running a test with the following variables:
- Conversation API (Our busiest API) scaled up to 80 containers
- Conversation length 1000 messages
- 160 Buildkite Agents running 10 Chrome instances each

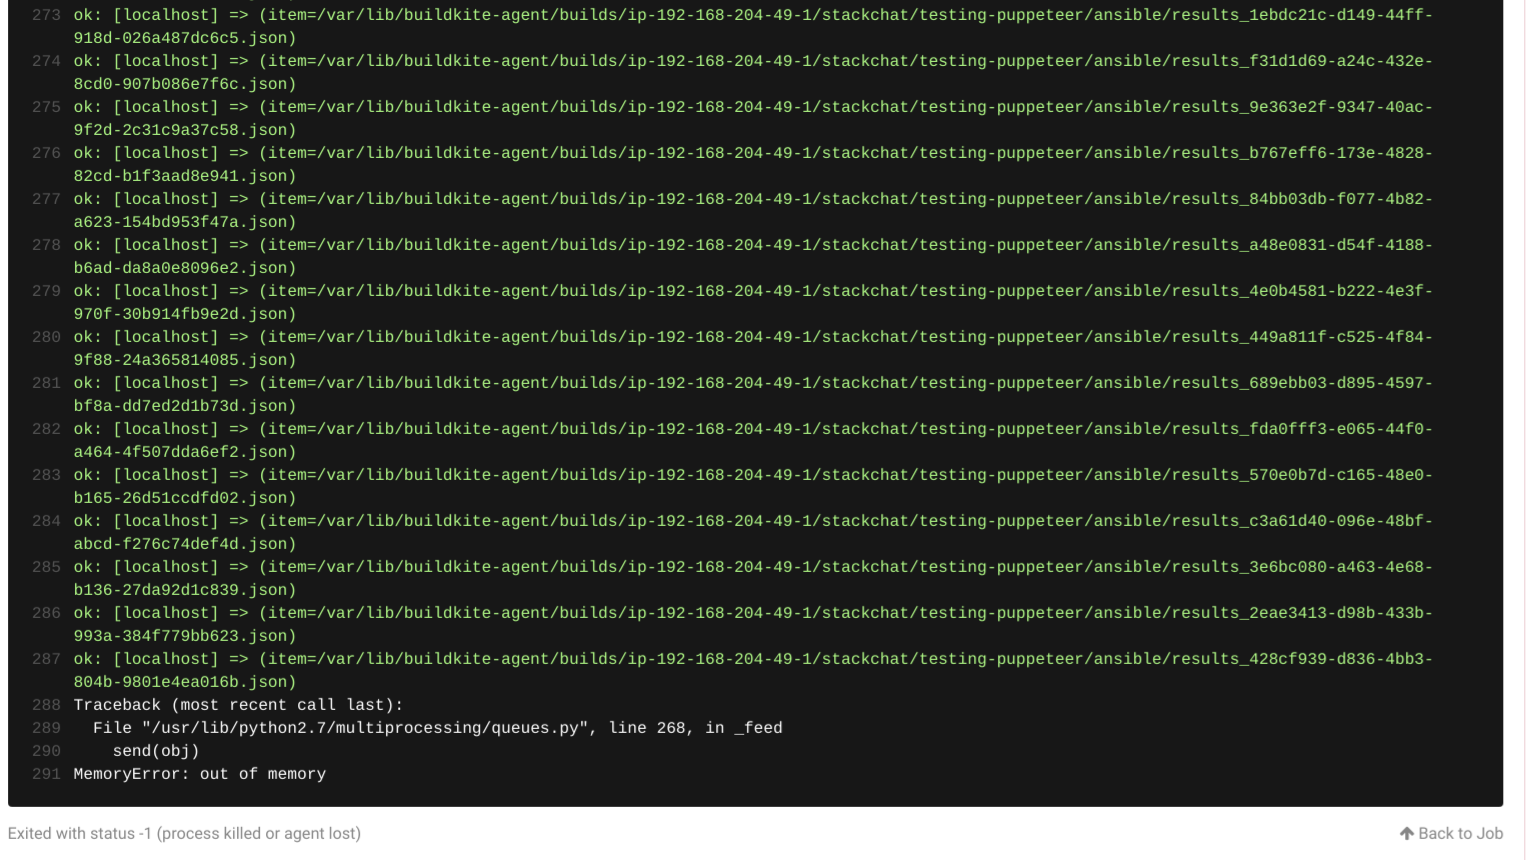
As you can see the tests all ran fine (huzzah!), but the pipeline to compile the results failed.
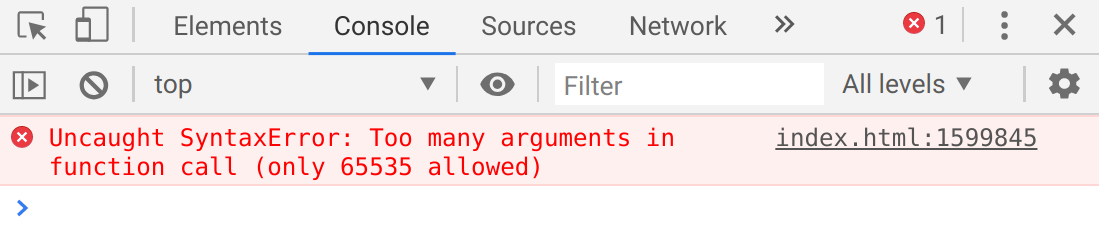
On investigation it turned out the results_display Ansible role was trying to read the 1,600,000 data points into an array in ram, as per the previous playbook. Needless to say this required a lot of ram. To get this test over the line we kept upping the size of the build agent to try and get it to finish the job, but no matter how large we went, we kept getting:
So to get the test run and the graphs produced we decided to do this locally. We made a couple of bash scripts to download and concatenate the data:
bk_download_artifacts
1#!/bin/bash2# Usage: ./bk_download_artifacts buildNumber pages destDir apiKey3# Example: ./bk_download_artifacts 405 3 ~/Downloads/results 069ads9636as6996as666996as4mkdir -p $3/$1/results5for PAGE in $(seq 1 $2); do6 echo "PAGE - $PAGE"7 ARTIFACTS=$(curl -s -G -H "Authorization: Bearer $4" -G https://api.buildkite.com/v2/organizations/stackchat/pipelines/testing-puppeteer/builds/$1/artifacts -d "page=$PAGE" -d "per_page=100"|jq '.[].id'|sed 's/\ /\n/g'|sed 's/"//g')8 for ARTIFACT in $ARTIFACTS; do9 S3_URL=$(curl -s -H "Authorization: Bearer $4" "https://api.buildkite.com/v2/organizations/stackchat/pipelines/testing-puppeteer/builds/$1/jobs/a10fd2ee-9ab2-47cf-906a-4170984c3396/artifacts/$ARTIFACT/download"|jq '.url'|sed 's/"//g')10 echo "Downloading $3/$1/results/$ARTIFACT.json"11 curl $S3_URL -o $3/$1/results/$ARTIFACT.json12 done13done14
bk_compile_results
1#!/bin/bash2# Usage: ./bk_compile_results resultsDir3echo -n '[' > results.json4for i in `ls results/*`; do5 cat $i >> results.json6 echo -n ',' >> results.json7 sed -i 's/,,/,/g' results.json8done9sed -i 's/,$//g' results.json10echo -n ']' >> results.json11
This worked a treat, but when we tried to embed those results in our Google Charts page:
Javascript says no
Determined to see those 1.6 million lovely dots and anxious to know what the response times looked like, we decided to try using a Jupyter Notebook instead. This is what we came up with:
1{2 "cells": [3 {4 "cell_type": "code",5 "execution_count": null,6 "metadata": {},7 "outputs": [],8 "source": [9 "import pandas as pd"10 ]11 },12 {13 "cell_type": "code",14 "execution_count": null,15 "metadata": {},16 "outputs": [],17 "source": [18 "import seaborn as sns\n",19 "sns.set(style=\"whitegrid\")"20 ]21 },22 {23 "cell_type": "code",24 "execution_count": null,25 "metadata": {},26 "outputs": [],27 "source": [28 "import matplotlib.pyplot as plt"29 ]30 },31 {32 "cell_type": "code",33 "execution_count": null,34 "metadata": {},35 "outputs": [],36 "source": [37 "data = pd.read_json('/home/sbanks/Downloads/results/results.json')"38 ]39 },40 {41 "cell_type": "code",42 "execution_count": null,43 "metadata": {},44 "outputs": [],45 "source": [46 "df = pd.DataFrame(data)\n",47 "df2 = df.divide(1000)"48 ]49 },50 {51 "cell_type": "code",52 "execution_count": null,53 "metadata": {},54 "outputs": [],55 "source": [56 "df2.columns = ['startTime', 'duration']"57 ]58 },59 {60 "cell_type": "code",61 "execution_count": null,62 "metadata": {},63 "outputs": [],64 "source": [65 "df2.duration.describe()"66 ]67 },68 {69 "cell_type": "code",70 "execution_count": null,71 "metadata": {},72 "outputs": [],73 "source": [74 "df2['duration'].quantile(.50)"75 ]76 },77 {78 "cell_type": "code",79 "execution_count": null,80 "metadata": {},81 "outputs": [],82 "source": [83 "df2['duration'].quantile(.95)"84 ]85 },86 {87 "cell_type": "code",88 "execution_count": null,89 "metadata": {},90 "outputs": [],91 "source": [92 "df2['duration'].quantile(.99)"93 ]94 },95 {96 "cell_type": "code",97 "execution_count": null,98 "metadata": {},99 "outputs": [],100 "source": [101 "sns.set(font_scale=5, style=\"whitegrid\")\n",102 "f, ax = plt.subplots(figsize=(80, 40))\n",103 "sns.despine(f, left=True, bottom=True)\n",104 "fig = sns.scatterplot(x=\"startTime\",\n",105 " y=\"duration\",\n",106 " palette=\"ch:r=-.2,d=.3_r\",\n",107 " linewidth=0,\n",108 " data=df2,\n",109 " ax=ax)\n",110 "plt.xlabel(\"Timeline (Seconds)\")\n",111 "plt.ylabel(\"Response Time (Seconds)\")\n",112 "plt.show(fig)\n",113 "plt.savefig('timeline.png')"114 ]115 }116 ],117 "metadata": {118 "kernelspec": {119 "display_name": "Python 3",120 "language": "python",121 "name": "python3"122 },123 "language_info": {124 "codemirror_mode": {125 "name": "ipython",126 "version": 3127 },128 "file_extension": ".py",129 "mimetype": "text/x-python",130 "name": "python",131 "nbconvert_exporter": "python",132 "pygments_lexer": "ipython3",133 "version": "3.8.2"134 }135 },136 "nbformat": 4,137 "nbformat_minor": 4138}139
Quantiles (in seconds)

The generated graph
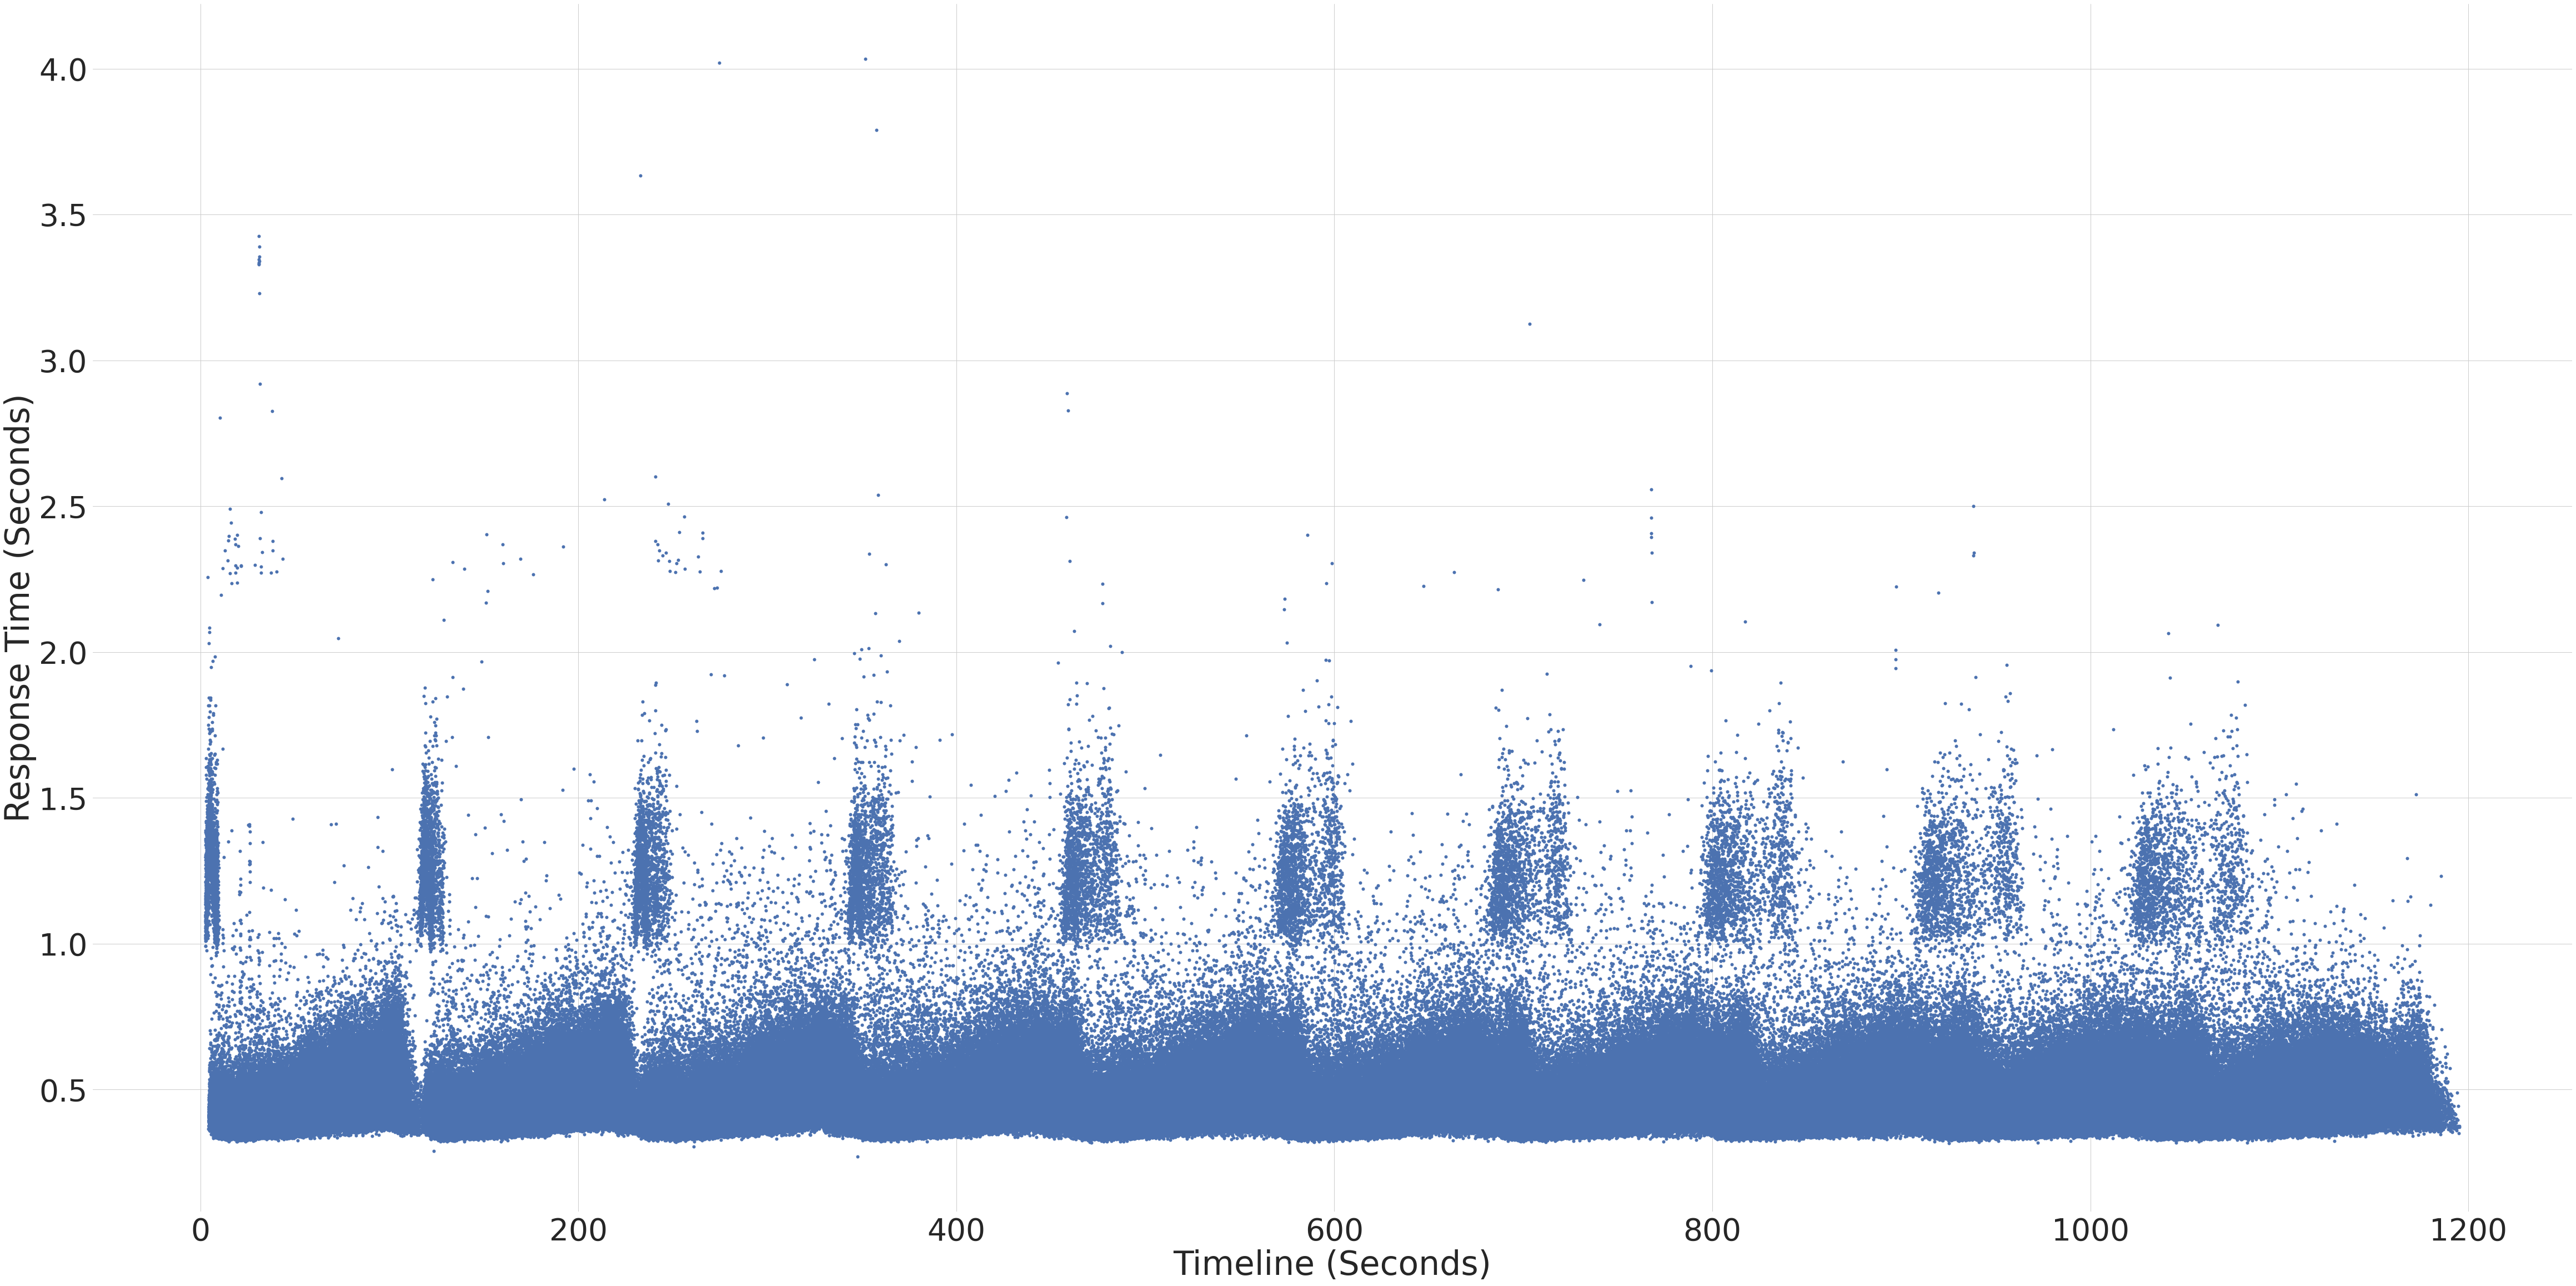
Success! We will eventually integrate Jupyter notebook generation into our pipelines, but for now we are very happy with the results and the confidence they have given us in our platform to quickly scale out horizontally.
Hopefully the code examples here will help you to get started with your own testing.